Water Stains on Ceilings: Causes, Removal, and Prevention

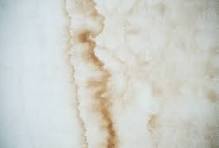
Nothing can be more alarming than discovering a water stain on your ceiling. It can start with a small, discolored patch, but over time, these stains can become a bigger problem. Water stains on ceilings are common, but understanding their causes, how to remove them, and how to prevent them can save you time, money, and stress. In this post, we’ll dive into the causes of water stains, how to remove them, and tips to prevent them from happening again.

Causes of Water Stains on Ceilings

Water stains on your ceiling are often a sign of an underlying issue. Several potential causes can lead to water infiltration, resulting in these unsightly spots. Let’s look at some of the most common culprits:

1. Roof Leaks

Roof leaks are among the most common causes of water stains. Faulty roof flashing, damaged shingles, or even small holes from improperly installed nails can cause water to seep into your home. Over time, this water can trickle down to your ceilings, leaving behind a stain. Issues like old pipe boots or worn-out roof flashing are typical offenders.

2. Plumbing Problems

Plumbing issues, particularly in bathrooms, are another major cause of water stains. Leaky pipes, old caulking, or deteriorating seals around toilets and sinks can lead to water escaping and finding its way to the ceiling below. Toilets and sinks are often where leaks are most noticeable, but they can be hard to detect until the damage has already been done.

3. Condensation

Poor ventilation in high-humidity areas like kitchens, bathrooms, or laundry rooms can lead to condensation. When warm, moist air meets a cold surface, it can cause water droplets to form, which can lead to stains. If you’re seeing a stain in a bathroom or kitchen, this could be the problem.

4. HVAC System Issues

Your HVAC system can also contribute to water stains. A leaking duct, clogged drain lines, or a cracked drip pan can all lead to water accumulation in your ceiling. If your HVAC system is aging, it may be time to have it checked.

5. Foundation Issues

Sometimes, water stains are caused by leaks in the foundation of the home. This could be due to cracks in the foundation, around windows, or near chimneys. These areas might not always be easy to detect, so regular inspections are key to catching foundation issues early.

How to Identify the Source of Water Stains

Before you take action, it’s important to identify where the water is coming from. Here’s how to start:

  1. Visual Inspection: Examine the ceiling for discoloration. If it’s near a bathroom, kitchen, or laundry room, condensation might be the culprit. If it’s near a roofline, it could be a leak.
  2. Check the Roof: If the roof is easily accessible, inspect it for missing shingles or areas that might be worn down. Check the attic for water damage or mold growth, which can help you spot leaks.
  3. Inspect the Plumbing: Look for leaks around sinks, toilets, and bathtubs. Pay attention to areas with old caulking or seals, as these are often prime areas for leaks.
  4. Use a Moisture Meter: This tool can help you pinpoint areas with excess moisture, allowing you to focus on the source of the water.
  5. Call a Professional: If you’re unable to determine the cause, it’s a good idea to call a leak detection professional. They can assess areas you may not be able to reach, such as pipes behind walls or the roof.

How to Remove Water Stains on Ceilings

Once you’ve identified the source of the water and made necessary repairs, you can begin the process of cleaning and repairing the water stain. Here’s how to do it:

  1. Fix the Leak: Before removing the stain, make sure the source of the water is completely fixed. If there’s an ongoing leak, the stain will likely reappear.
  2. Prepare the Area: Ventilate the room by opening windows and doors. Protect the area around the stain with a drop cloth, and wear protective gloves and goggles.
  3. Remove the Stain: Use a putty knife to scrape off any damaged materials, such as peeling paint or plaster. Gently clean the stained area with a damp cloth and mild detergent, then let it dry completely.
  4. Repair the Damage: If there are holes in the ceiling, fill them with spackle or drywall compound. Once the area is dry, sand it smooth before painting over the stain to match the surrounding ceiling color.

How to Prevent Water Stains on Ceilings

The best way to deal with a water stain is to prevent it from happening in the first place. Here are some proactive steps to help you avoid ceiling water stains:

  1. Regular Roof Inspections: Especially if your home is older, schedule a roof inspection every 1-2 years. Look for any missing or damaged shingles, worn-out flashing, or other areas that might lead to leaks.
  2. Address Plumbing Issues Early: Regularly inspect pipes and caulking in bathrooms and kitchens. Fix any leaks, and replace old seals to prevent water from escaping.
  3. Maintain Proper Ventilation: Ensure that bathrooms, kitchens, and laundry rooms are properly ventilated. Install or repair exhaust fans to help reduce moisture buildup.
  4. Inspect Your HVAC System: Have your HVAC system professionally inspected to avoid leaks from ducts, pans, or clogged lines that could lead to water damage.
  5. Address Foundation Issues: If you notice cracks or water pooling near the foundation, address these issues early. Cracks in the foundation can lead to water leaks into your home.

Water stains on your ceiling are more than just an eyesore—they can be a sign of a serious problem. Understanding the causes of water stains, knowing how to identify the source, and following a solid plan for repair and prevention will save you from further headaches down the line. Don’t ignore water stains—acting quickly can prevent more significant damage to your home. Regular maintenance and inspections are key to keeping your home dry, safe, and damage-free.

Essential Plumbing and Water Maintenance Tips for a Smooth-Running Home

Keeping your plumbing and water systems in top shape is crucial for avoiding unexpected problems and ensuring everything runs smoothly. Regular maintenance can help extend the life of your appliances, prevent costly repairs, and improve the efficiency of your home. Here are some key plumbing and water maintenance tasks you can easily tackle to keep things flowing without a hitch.

1. Check the Water Softener and Replenish Salt if Necessary

If you have a water softener, it’s important to check the salt level regularly. Hard water can leave deposits on your pipes, faucets, and appliances, which can lead to clogs, mineral buildup, and reduced efficiency. The water softener works by removing minerals like calcium and magnesium, and replenishing the salt ensures that it continues to function properly.

To maintain your water softener:

  • Open the salt tank and check the level. If it’s low, add more salt, making sure you use the recommended type (usually sodium chloride or potassium chloride).
  • Clean the tank every six months to remove any salt bridges or clumps that can block the salt from dissolving properly.
  • If you notice an increase in water hardness or residue build-up, consider recharging or servicing your softener.

2. Clean the Garbage Disposal

Garbage disposals are a convenient tool for eliminating food waste, but they can easily develop odors or get clogged. A simple cleaning routine can keep it working efficiently and smelling fresh. Here’s how you can clean your garbage disposal:

  1. Grind ice cubes: Fill the disposal with ice cubes and turn it on. Grinding the ice helps dislodge debris and sharpens the blades.
  2. Flush with hot water: Run hot water through the disposal after grinding the ice to clear away any remaining bits of food and residue.
  3. Baking soda and vinegar: Pour ½ cup of baking soda followed by ½ cup of vinegar into the disposal. Let it sit for a few minutes, then flush with hot water. This helps break down grease and neutralize odors.

For an extra boost, consider using lemon peels or a disposal cleaning product specifically designed to combat odors and residue.

3. Inspect Tub and Sink Drains for Debris; Unclog if Necessary

Clogged drains are one of the most common plumbing issues homeowners face. Whether it’s hair in the bathroom or food particles in the kitchen, buildup in drains can slow down water flow and lead to bigger blockages over time. Here’s what you can do to keep your drains running smoothly:

  • Remove visible debris: For tub and sink drains, start by inspecting the drain covers and removing any visible hair, soap scum, or debris that may be blocking the flow.
  • Use a drain snake or plunger: If you notice slow drainage, try using a drain snake or plunger to dislodge the obstruction. For tougher clogs, a mixture of baking soda and vinegar can help break down buildup.
  • Preventive measures: Consider using drain catchers in sinks and tubs to collect hair and other debris before it enters the drain. This can prevent clogs from forming in the first place.

Regular drain cleaning can prevent buildup from turning into a major plumbing headache.

4. Flush Out Hot Water from the Water Heater

Over time, sediment and minerals from hard water can accumulate in the bottom of your water heater tank, which can affect its efficiency and lifespan. Flushing the water heater helps remove this sediment, ensuring it operates efficiently and extends its life.

To flush your water heater:

  1. Turn off the power and water supply: For electric water heaters, turn off the power at the breaker. For gas heaters, set the thermostat to the lowest setting. Turn off the water supply to the heater.
  2. Attach a hose to the drain valve: Place the other end of the hose in a drain or outside where the water can flow out safely.
  3. Open the drain valve: Allow the water to flow out, taking any sediment with it. You might hear a gurgling sound or notice some cloudy water at first.
  4. Flush with clean water: Once the water runs clear, turn the water supply back on to rinse the tank.
  5. Close the valve and restore power: Once you’ve finished, close the drain valve, remove the hose, and turn the water and power supply back on.

Flushing the tank once a year helps maintain the efficiency of your water heater and prevent issues like reduced heating capacity or premature failure.

Regular Maintenance Saves Time and Money

Taking care of your plumbing and water systems is an essential part of homeownership. By checking and replenishing your water softener, cleaning the garbage disposal, unclogging drains, and flushing out your water heater, you can avoid costly repairs and improve the overall efficiency of your home’s water system. With these simple tasks, you can keep your home running smoothly and enjoy peace of mind knowing that you’re preventing bigger problems down the road.

Test Your Water: A Smart Winter Task for Better Health and Home Maintenance

Did you know that over half of Americans have never tested their water? Winter is an ideal time to make sure you’re not overlooking the quality of the water you use every day, from drinking and cooking to showering and cleaning. Testing your water can not only improve your health but can also save you money on plumbing repairs, maintenance, and appliance longevity.

Why Test Your Water?

One common water issue is hard water, which contains high levels of minerals like calcium and magnesium. While these minerals might not be harmful to your health, they can cause significant damage to your home. Hard water leads to:

  • Mineral buildup on faucets, showerheads, and appliances, making cleaning more difficult.
  • Scaling in plumbing pipes and water heaters, reducing the lifespan of your plumbing system and resulting in costly repairs or replacements.

Testing your water is the first step toward understanding what’s in your water and addressing any potential issues before they escalate.

How to Test Your Water

Testing your water is simple and can be done at home with a water testing kit. A great option to consider is the Safe Home Drinking Water Test Kit, which consistently ranks highly in reviews. This kit allows you to send a water sample to an EPA-certified lab, where it will be analyzed for a variety of contaminants such as lead, chlorine, bacteria, and hardness levels.

Once the lab tests your water, you will receive a detailed report outlining the quality of your water and potential risks. The results will help you understand the exact components of your water supply and what specific treatment it may need.

What to Do with Your Water Test Results

After receiving your water quality report, it’s time to make decisions about improving your water system. This might involve investing in a whole-house water filter, especially if you’re dealing with issues like hard water or contamination. Understanding your water’s unique characteristics is essential to selecting the right filtration system for your home.

For instance, if your water contains high mineral levels, a water softener might be necessary to protect your plumbing and appliances from the damaging effects of hard water. A whole-house filtration system can also address concerns like chlorine taste or the presence of harmful bacteria.

Pro Tip: Get Expert Advice

While testing your water is an important first step, it’s highly recommended that you seek the expertise of a water treatment professional. These experts can conduct further evaluations, test for other water quality factors that may not have been covered by your at-home kit, and provide recommendations for a customized treatment system based on your specific needs.

If you plan to start your spring garden soon, knowing your water’s quality will help you make informed choices about irrigation and fertilization. Some plants may not thrive with certain water contaminants, and a water filter may be just what you need to ensure the health and success of your garden.

Water testing is one of those small tasks that can make a big difference, both for your home and your health. As the winter months provide a perfect time to check on your water quality, taking the initiative now can save you significant trouble—and money—down the road. Plus, by proactively improving your water quality, you’ll be better prepared for the year ahead, whether that means enhancing your home’s water systems or boosting the success of your spring garden.

Prepare Your Yard for Spring and Summer: Essential Tips

As the days grow longer and warmer, it’s time to get your yard ready for the vibrant seasons ahead. Here are three essential steps to ensure your outdoor space thrives this spring and summer.

1. Fertilize the Lawn

Start by giving your lawn a boost with a high-quality fertilizer. Spring is the perfect time to replenish nutrients that may have been depleted over the winter months. Choose a fertilizer specifically formulated for spring application, and follow the instructions carefully for best results. A well-fed lawn will be healthier, greener, and more resilient to heat and drought throughout the summer.

2. Rake Your Garden Beds

Remove any debris, leaves, or dead vegetation from your garden beds to prepare them for new growth. Raking helps improve air circulation, prevents disease, and allows sunlight to reach the soil. It also gives you a chance to inspect your plants for any signs of damage or disease that may have occurred during the winter. Once your garden beds are clean and tidy, you’ll be ready to plant and enjoy colorful blooms all season long.

3. Seed the Lawn

If your lawn has bare patches or thin areas, spring is the ideal time to overseed. Choose a grass seed blend that’s suited to your climate and lawn type, and spread it evenly over the bare areas. Rake the seed lightly into the soil, then water thoroughly to promote germination. Regular watering and proper care will encourage healthy new grass growth, filling in bare spots and creating a lush, green lawn for summer.

With these simple steps, you can get your yard in top shape for the spring and summer months ahead. Fertilizing the lawn, raking your garden beds, and seeding any bare areas will ensure that your outdoor space is healthy, vibrant, and ready to enjoy all season long. So roll up your sleeves, get outside, and start preparing your yard for a season of beauty and enjoyment.

Scotts Turf Builder EdgeGuard DLX Broadcast Spreader for Seed, Fertilizer, Salt, Ice Melt, Holds up to 15,000 sq.ft. Product https://amzn.to/3wmhcZQ
Steel Tines Metal Head Rake Tool for Loosening Soil Gathering Leaf Leveling Lawn Farming Land Management Yarn Thatch Rake https://amzn.to/4a9V7LQ
2 Gallon Watering Can for Outdoor Plants with Removable Long Spout and Stainless Steel Sprinkler Head, Large Plastic Watering Can for Garden Flowers Plants https://amzn.to/3y45zHp