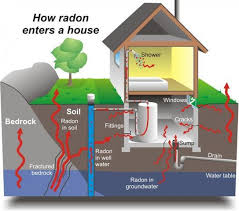
Enjoy Fresh Air Without the Bugs: The Magnetic Screen Door

There’s nothing like opening your doors to let fresh air flow through your home. Unfortunately, that often comes with an unwanted side effect—bugs, dust, and debris sneaking inside. A magnetic screen door offers the perfect solution, letting the breeze in while keeping the pests out.

Built to Last

Unlike traditional fiberglass mesh, modern magnetic screen doors are made with high-quality PET material. This upgrade makes the screen sturdier, tear-resistant, and resistant to oxidation, so it stands up to daily use while still looking great.

Easy Access for Everyone

Thanks to strong built-in magnets and a weighted gravity rod at the bottom, the screen opens easily and closes automatically behind you. Kids and pets can move through without fuss, and even if your hands are full, you can walk right through without worrying about leaving the door open.

More Than Just a Bug Barrier

A magnetic screen door doesn’t just block insects—it enhances your lifestyle. It keeps your living space fresh, comfortable, and free from flying pests, so you can enjoy open doors without compromise. Whether you’re cooking, hosting, or simply relaxing, the mesh door ensures you get the best of both worlds: fresh air and peace of mind.

A magnetic screen door is a small upgrade with a big impact. It’s practical, durable, and designed to make everyday life easier and more comfortable. Say goodbye to bugs and hello to breezy, bug-free living.

https://amzn.to/3JURsdw
https://amzn.to/4mg4vnl

Always Renovating? 3 Ways to Stay Organized and Avoid Decision Fatigue

Do you feel like your home is always under construction—big or small? A new paint color here, a bathroom project there, maybe even a full remodel? Renovations can be exciting, but they can also feel never-ending and overwhelming. The constant stream of choices—tile, fixtures, layouts, colors—can lead to decision fatigue if you’re not careful.

The good news: with the right approach, you can stay organized and keep your sanity intact. Here are three strategies to help.

1. Create a Master Plan

Instead of tackling projects one at a time with no roadmap, create a master plan for your home. List your priorities, set a realistic timeline, and budget for each project. This helps you see the bigger picture and avoid redoing decisions later.

2. Limit Your Choices

Too many options can be paralyzing. Narrow down your selections before you shop—whether it’s choosing from three paint swatches instead of 30, or focusing on two flooring types instead of five. Simplifying choices saves time and energy.

3. Keep a Renovation Binder (or Digital Folder)

Stay organized by keeping everything in one place—contracts, receipts, swatches, and inspiration photos. Having easy access to your materials avoids confusion and keeps you on track when decisions pile up.

Renovations don’t have to drain your energy. By creating a master plan, limiting choices, and keeping organized records, you’ll reduce decision fatigue and keep your home projects moving forward—without burning yourself out.

4 Items You Should Never Keep by Your Stove

Your stove is the heart of your kitchen, but it’s also a hotspot for potential hazards. Keeping certain items nearby may seem convenient, but it can increase the risk of fire, burns, or other accidents. Here are four things you should never store by your stove:

1. Flammable Items

Paper towels, dish towels, napkins, and cookbooks are all highly flammable. Even a small spark or a splash of oil can ignite them, so keep these items at a safe distance.

2. Extra Cooking Oils

While it’s tempting to have bottles of oil within arm’s reach, storing them near the stove can be dangerous. Heat can cause oils to ignite, especially if the bottle leaks or spills. Keep extra oil in a cool, dry cupboard instead.

3. Aerosol Cans

Cooking sprays, air fresheners, and cleaning products may seem harmless, but they can explode when exposed to high heat. Store them in a cabinet away from your stovetop.

4. Plastic Utensils or Containers

Plastic can melt or warp if it gets too close to the burners. This not only ruins the item but can also release harmful fumes into your kitchen. Keep plastics well away from hot surfaces.


Kitchen safety isn’t just about cooking carefully—it’s about keeping dangerous items out of harm’s way. By storing flammables, oils, aerosols, and plastics away from your stove, you reduce the risk of accidents and keep your kitchen safe for everyone.

The Benefits of a Keyless Garage Door Access System

Technology has made our lives more convenient in countless ways, and your garage is no exception. Keyless garage door access systems are becoming increasingly popular, and for good reason. They offer enhanced security, convenience, and peace of mind for homeowners. Here’s why upgrading might be worth it:

1. Enhanced Security

Traditional keys can be lost, stolen, or copied. Keyless systems eliminate the risk of unauthorized duplicates. Many systems also allow you to change access codes easily, providing an extra layer of security.

2. Convenience and Ease of Use

No more fumbling for keys in the dark or worrying about carrying a garage door remote. With a keyless system, you can enter your garage with a code, key fob, or even your smartphone, making your daily routine smoother.

3. Access Management

Keyless systems allow you to give temporary or permanent access to family members, friends, or service providers without handing out physical keys. This is especially handy for cleaners, dog walkers, or maintenance personnel.

4. Durability and Reliability

Keyless systems are built to withstand the elements and daily use. Unlike traditional locks, there’s no worry about mechanical wear or broken keys. Many systems also have backup options, such as battery-powered entry or emergency codes, so you’re never locked out.

5. Modern Features and Integration

Many keyless systems integrate with smart home technology, allowing you to monitor your garage remotely, receive notifications when it’s opened, and even automate routines like closing the door after a certain time.


A keyless garage door access system combines security, convenience, and modern technology to make life easier for homeowners. Upgrading your garage entry isn’t just about keeping your home safe—it’s about making everyday life smoother and more efficient.

https://amzn.to/3HKGiaz

Effortless Furniture Moving: The Benefits of Furniture Movers

Moving heavy furniture can be a daunting task, often leading to scratches, scuffs, and strained muscles. However, with the help of furniture movers, you can slide your furniture effortlessly across various surfaces without causing damage or exerting excessive effort. Let’s explore the benefits of using furniture movers and how they can make your life easier.

What Are Furniture Movers?

Furniture movers, also known as sliders or gliders, are small, often disk-shaped tools that are placed underneath the legs or corners of heavy furniture. These sliders are typically made of durable materials like plastic or rubber and have smooth surfaces that allow furniture to glide easily across floors without scratching or damaging them.

Benefits of Using Furniture Movers

  1. Protect Your Floors: One of the primary benefits of furniture movers is their ability to protect your floors from scratches, dents, and scuffs. By reducing friction between the furniture and the floor, sliders prevent damage caused by dragging or sliding heavy items.
  2. Effortless Moving: Furniture movers make moving heavy furniture much easier and less strenuous. Instead of lifting and carrying heavy items, you can simply slide them across the floor with minimal effort, reducing the risk of strain or injury.
  3. Versatility: Furniture movers can be used on various surfaces, including hardwood, tile, laminate, carpet, and vinyl. Whether you’re rearranging furniture in your living room or moving appliances in the kitchen, sliders provide a versatile solution for easy mobility.
  4. Preserve Your Furniture: In addition to protecting your floors, furniture movers also help preserve the integrity of your furniture. By eliminating the need to lift and drag heavy items, sliders reduce the risk of damage to the furniture itself, such as scratches, dents, or loose joints.

How to Use Furniture Movers

Using furniture movers is simple:

  1. Place a slider under each leg or corner of the furniture you want to move.
  2. Once in position, gently push or pull the furniture in the desired direction. The sliders will allow it to glide smoothly across the floor.
  3. When you’ve reached the desired location, remove the sliders and enjoy your newly arranged space.

Furniture movers are a simple yet effective solution for moving heavy furniture with ease and preventing damage to your floors and furniture. Whether you’re rearranging your home or preparing for a move, sliders provide a convenient and versatile way to make furniture mobility effortless. Invest in a set of furniture movers and say goodbye to the hassle of heavy lifting and potential floor damage.

Why a Non-Slip Rug Pad is a Must-Have for Your Home

Rugs can completely transform a space—they add warmth, style, and comfort. But they can also be a hazard if they slip or bunch underfoot. That’s where a good non-slip rug pad comes in.

A high-quality pad keeps your rugs securely in place, so you don’t have to worry about tripping or sliding during everyday use. Whether you’re rushing to answer the door, chasing after kids, or just walking around in socks, a rug pad provides the stability you need.

But the benefits go beyond safety. A non-slip pad also protects your floors from wear and tear. High heels, active children, or moving furniture can all damage hardwood, laminate, or tile floors over time. By placing a pad under your rug, you create a cushion that absorbs impact and prevents scratches, dents, or scuffs.

Pro Tip: Look for pads that are easy to trim to fit your rug’s size and made from materials that won’t stain or stick to your flooring. This ensures maximum grip without any damage.

In short, a non-slip rug pad is a small investment that brings big peace of mind—protecting your floors and keeping your home safe and comfortable for everyone who lives there.

https://amzn.to/3HRncPR

Veken Rug Gripper Pad 

Maximize Small Spaces with a Rotating Surge Protector Outlet Extender

If you’ve ever tried to charge multiple devices in a tight corner of your home, you know the struggle—plugs bumping into each other, cords tangling, and some devices not fitting at all. That’s where a rotating surge protector outlet extender becomes a game-changer.

These clever gadgets not only protect your devices from power surges, but their rotating outlets allow you to plug in bulky chargers, vacuums, and other large adapters without blocking neighboring plugs. In small spaces like laundry rooms, closets, or behind furniture, they make what seemed impossible completely doable.

Here’s why I love them: I can charge my cordless vacuum, plug in a phone charger, and power a lamp—all in one outlet. The rotating design means I don’t have to contort cords or rearrange furniture. Plus, surge protection gives peace of mind for pricey devices.

Tips for using a rotating surge protector effectively:

  1. Check the wattage: Make sure your devices don’t exceed the extender’s rating.
  2. Keep it accessible: Place it where it’s easy to rotate the plugs without unplugging everything.
  3. Use it for high-draw devices: Vacuums, heaters, or power tools often need more space—rotating extenders make it possible.
  4. Avoid daisy-chaining: Don’t plug one extender into another; it can be a fire hazard.

For anyone dealing with cramped corners or multiple devices, a rotating surge protector outlet extender is a small investment with a big impact. It keeps your space organized, your devices safe, and your cords untangled—a win-win for any home.

https://amzn.to/4oxkS1f

The Small Upgrade That Could Save Your Home

Let’s talk about one of the simplest, most overlooked safety upgrades you can make to your home. It costs less than a fancy cup of coffee, takes five minutes, and could make a huge difference if someone ever tries to force their way through your front door.

Ready?

Replace those tiny screws in your door frame plates with 4-inch ones.

That’s it. That’s the tip.

But wait—let me explain why this tiny upgrade packs a big punch.

Why Your Door Isn’t as Secure as You Think

Most exterior doors come with a strike plate (that metal piece your door latch clicks into) and hinge plates—installed with laughably short screws. We’re talking half an inch to maybe an inch long. That means those screws are only anchoring into the flimsy door frame trim—not the sturdy wall studs.

Translation? If someone gives your door a good shoulder bash (or a well-placed kick), that strike plate could tear right out. Scary, right?

The 4-Inch Screw Fix

Here’s what you do:

  1. Open your front (or back) door.
  2. Take a screwdriver or drill and remove the short screws from the strike plate and hinge plates.
  3. Replace them with 3.5- or 4-inch wood screws.
  4. Make sure they bite deep into the wall stud behind the trim.

Just like that, your door is now far more resistant to brute force. Instead of the strike plate flying off with the door frame splintering like a toothpick, it’s got serious reinforcement backing it up.

Longer screws in the hinges help keep the door on the hinges if someone tries to kick it down.

When I Did This, I Slept Better

I made this change after seeing a video of a guy breaking down a door in under five seconds. FIVE. SECONDS.

That night, I rummaged through the garage, found some 4-inch wood screws, and got to work. It took maybe ten minutes total. Then I sat down on the couch and thought, That’s probably the most valuable ten minutes I’ve spent all week.

I’m not saying this is a substitute for a security system. But it’s a smart layer of defense—the kind of simple home improvement that pays for itself in peace of mind.

We spend so much time upgrading things like smart thermostats and fancy appliances. But sometimes, the smartest upgrades are the ones no one sees—the ones that keep your home (and everyone in it) safe.

https://amzn.to/45G1JT6

Save Money and Reduce Waste: Wash Your Shower Curtain Liner Instead of Replacing It

If you’ve ever tossed a grimy shower curtain liner into the trash and headed out to buy a new one, you’re not alone. Most people don’t realize that you can actually clean your shower curtain liner—and it’s surprisingly easy.

Washing your liner not only saves money but also helps cut down on unnecessary waste. And the best part? You likely have everything you need already at home.

🛁 How to Wash Your Shower Curtain Liner

Step 1: Gather Your Supplies
You’ll need your plastic or vinyl shower curtain liner, 2-3 soiled towels (these act as gentle scrubbers), baking soda, your usual detergent, and white vinegar.

Step 2: Toss It in the Washer
Place the liner and towels in the washing machine. Add your regular amount of detergent plus ½ cup of baking soda.

Step 3: Add Vinegar During the Rinse Cycle
When the rinse cycle begins, pour in ½ cup of white vinegar. This helps break down any leftover soap scum or mildew.

Step 4: Hang to Dry
Once the cycle is complete, simply hang the liner back up to dry—no dryer needed!

🌿 Why This Works

  • The towels scrub away grime without damaging the liner.
  • Baking soda is a natural deodorizer and cleaner.
  • Vinegar kills bacteria and removes buildup.

It’s a simple trick that leaves your bathroom fresher and your wallet a little heavier.

Next time your shower curtain liner starts looking a little worse for wear, give it a spin in the washer before replacing it. It’s a small step that’s better for your budget—and the planet.

Why Your Fitted Sheet Keeps Popping Off—and How to Fix It

Is there anything more frustrating than waking up to find your fitted sheet has slipped off the corner of your bed again? You tug it back into place, but by the next morning—it’s popped off like a stubborn spring. If you’re tired of fighting with your sheets, you’re not alone.

Let’s talk about why it happens and, more importantly, how to fix it.

Why Do Fitted Sheets Come Off?

1. Your Sheet Isn’t the Right Size

The most common reason? The sheet just doesn’t fit. If it’s too small, it won’t stretch far enough to grip the mattress. Too big, and it bunches up and slides off.

💡 Fix: Always check the dimensions of your mattress—including the depth—and match it with your sheet size. Queen, King, and even California King mattresses can vary widely.

2. Mattress Too Deep (or Too Shallow)

Today’s mattresses often come with extra depth or plush toppers, but not all fitted sheets are made to handle that.

💡 Fix: Look for “deep pocket” or “extra deep pocket” fitted sheets, which are designed to stay put on thicker beds.

3. Elastic Has Worn Out

Over time, the elastic band on your fitted sheet may stretch out or lose its snap, making it ineffective.

💡 Fix: If the rest of the sheet is still in good shape, consider adding sheet suspenders (corner straps) or replacing the sheet with one that has reinforced elastic all around.

4. Slick Mattress Surface

Memory foam, latex, and smooth mattress protectors can make it hard for your fitted sheet to grip, especially if the sheet isn’t anchored securely.

💡 Fix: Use a grip pad under the sheet or opt for sheets made of materials with more friction, like brushed cotton or flannel.

5. You’re a Restless Sleeper

If you move a lot in your sleep, you’re naturally tugging on your sheets all night. Combine that with any of the issues above, and you’ve got a recipe for a popped corner.

💡 Fix: Again, deep-pocket sheets and sheet straps are your best friend here.

Make Your Bed Stay Made

We spend nearly a third of our lives in bed—so having bedding that actually stays in place makes a big difference in comfort, convenience, and even quality of sleep.

Investing in the right size sheets, adding simple reinforcements like straps, or upgrading your bedding setup can stop the nightly battle with your fitted sheet—for good.

Sweet dreams (with all corners intact)!

https://amzn.to/4lT1k4Y