Hardwood floors add warmth, beauty, and value to your home—but when they’re really dirty, cleaning them can feel intimidating. You want to get them clean, but not at the cost of damaging the wood. Whether it’s built-up grime, layers of dust, or sticky spills, here’s the best way to deep clean your hardwood floors and bring them back to life safely.
Step 1: Dry Dust or Vacuum First
Before anything else, remove loose dirt, pet hair, and debris. Use:
A microfiber dry dust mop
A vacuum with a floor-brush attachment (never a beater bar—it can scratch the wood)
This prevents grit from scratching your floors during the wet cleaning step.
Step 2: Mix a Gentle Cleaning Solution
Skip the harsh chemicals and create your own hardwood-safe solution:
¼ cup white vinegar (natural degreaser and disinfectant)
1 gallon of warm water
Or use a commercial hardwood floor cleaner labeled as safe for sealed wood.
Avoid steam mops, ammonia, bleach, and oil-based soaps—they can dull or damage the finish.
Step 3: Damp Mop (Not Wet!)
Dip a microfiber mop into the solution, then wring it out thoroughly. You want the mop damp—not dripping. Mop the floor section by section, rinsing and wringing the mop often.
Pro Tip: Always go with the grain of the wood.
Step 4: Tackle Stubborn Spots
For stuck-on grime or scuff marks, use a soft cloth dampened with the vinegar solution and gently rub the spot by hand. For sticky residues, a tiny drop of dish soap mixed into your vinegar solution can help break it down.
Step 5: Dry the Floor Immediately
Moisture is the enemy of hardwood. After mopping, use a dry towel or microfiber cloth to go over the floor and make sure no moisture is left behind.
Optional: Restore Shine
If your floors still look dull after cleaning, consider using a hardwood floor polish or restorer made for your type of finish (polyurethane, wax, etc.). Always test a small area first.
With the right tools and a gentle touch, you can bring even the dirtiest hardwood floors back to a beautiful, clean finish. The key is consistency—cleaning regularly prevents grime buildup and protects your floors long-term.
When the summer heat rolls in, keeping your home cool and comfortable becomes a top priority. While air conditioning is great, it can be expensive to run all day long—and sometimes you just want a simple, efficient way to stay cool without cranking up your energy bill. That’s where tower fans come in.
What Makes Tower Fans Perfect for Summer?
1. Space-Saving Design Tower fans are slim and sleek, making them perfect for rooms where floor space is limited. Unlike bulky box fans or pedestal fans, tower fans fit neatly into corners or tight spots without getting in the way.
2. Powerful Airflow with Quiet Operation Don’t be fooled by their size—tower fans deliver strong, consistent airflow that helps circulate cool air throughout the room. Plus, most models run quietly, so you can sleep, work, or relax without the distracting hum of a traditional fan.
3. Multiple Speed and Mode Settings From gentle breezes to high-powered cooling, tower fans usually come with adjustable speed settings and modes like “natural wind” or “sleep mode.” This customization lets you tailor your cooling experience to your exact needs.
4. Energy Efficient Compared to running central air conditioning, tower fans use a fraction of the electricity. They’re an eco-friendly way to cool a room without breaking the bank on energy bills.
5. Convenient Features Many tower fans come with remote controls, timers, and oscillation features, giving you easy control from anywhere in the room. You can set it to turn off after you fall asleep or direct the airflow exactly where you need it.
How I Use Tower Fans in My Home
I keep a tower fan in the living room, bedroom, and even the kitchen. They help keep the air moving, reduce stuffiness, and make those hot summer evenings much more comfortable. Sometimes I use them alongside the AC to lower the thermostat setting, saving energy without sacrificing comfort.
Dreo’s all-in-one airflow system combines with a supercharged electric motor, delivering high-speed, refreshing winds. This 36-inch compact tower fan enlivens every inch of air in your living space fast at up to 25ft/s.
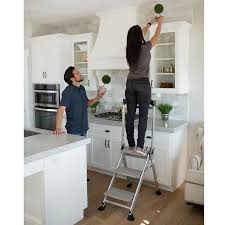
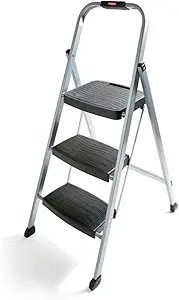
It’s not glamorous. It doesn’t require charging. It doesn’t even have Wi-Fi. But the step stool? It just might be one of the most useful tools in your entire home.
From reaching that top shelf in the pantry to helping little ones brush their teeth at the sink, a good step stool is the kind of household essential you don’t realize you need—until you need it.
Small But Mighty: Everyday Uses for a Step Stool
1. Reaching Higher (Safely!) No more wobbling on chairs or balancing on your tiptoes. A sturdy step stool keeps you safe while accessing top cabinets, changing lightbulbs, or hanging decorations.
2. Kitchen Helper Whether you’re grabbing a baking dish from the top shelf or involving kids in cooking, a step stool brings everything down to a safer, reachable level.
3. Bathroom Boost For kids learning independence, a step stool helps them wash hands, brush teeth, or even help put laundry away—all while feeling capable and grown-up.
4. Closet Climber Need to grab seasonal clothes from the top shelf or stow away those bulky comforters? A step stool makes the job easier (and quicker).
5. Home Projects Whether you’re painting a wall, dusting a ceiling fan, or installing curtains, a step stool gives you just the right height—without the bulk of a ladder.
Tips for Choosing the Right One
Look for stability – Rubber feet, a wide base, and solid construction are key.
Consider portability – A foldable or lightweight design makes it easy to move and store.
Think multi-use – Some stools double as seats, storage, or even plant stands!
A Small Tool That Lifts You Up (Literally)
Sometimes it’s the simplest things that make the biggest difference. A step stool won’t change your life—but it sure makes life easier. And safer. And a little more within reach.
So if you don’t already have one (or two), it might be time to step up your home game—literally.
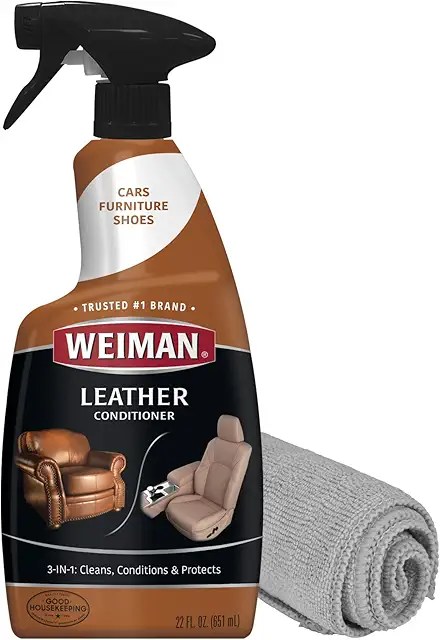
There’s something timeless and inviting about a leather couch. It adds warmth, character, and a touch of elegance to any living room. But leather, like skin, needs care to stay supple, rich, and free from cracking. That’s where a good leather conditioner comes in—and if you’re not using one regularly, your couch could be aging faster than it should.
I’ve made conditioning my couch a part of my seasonal cleaning routine. It’s a small habit that makes a big difference. Over the years, I’ve tried different conditioners, but the key has always been consistency and technique. Want to know my secret tool? A paintbrush.
Yes, a simple paintbrush.
Using a paintbrush helps me get into the creases and seams with precision, ensuring every inch of leather gets the hydration it needs. I dip the brush into the conditioner, apply a thin, even layer across the surface, then let it soak in before buffing it out with a soft cloth. It’s strangely satisfying, almost like a mini spa day for my couch.
Not only does conditioning help preserve the leather, but it also revives its appearance. A well-conditioned couch looks rich and smooth—and let’s be honest, it just feels better to sit on.
🛋️ Top Leather Conditioners for Couches:
Leather Honey Leather Conditioner
Deep conditioning formula.
Non-toxic, water-repellent, and lasts up to six months.
Spring is the perfect time to refresh your space and bring in the light—and while many of us remember to dust the shelves and swap out winter clothes, there are three often-overlooked areas that deserve some seasonal attention: tile, grout, and windowsills.
Tile: Shine It Up
Tile might look clean at a glance, but soap scum, water spots, and general buildup can dull its sparkle over time. Whether it’s in your kitchen backsplash or bathroom floor, give your tile a proper scrub this spring. A mix of warm water, dish soap, and a splash of vinegar can work wonders. For a deep clean, consider a tile-safe degreaser or steam cleaner.
Grout: Reclaim the White
Grout seems to attract everything you don’t want—mildew, stains, and grime. You don’t need harsh chemicals to bring it back to life. A paste of baking soda and water applied with an old toothbrush, followed by a light spray of vinegar, can lift years of buildup. Rinse and admire your handiwork!
Windowsills: Let the Sunshine In
Windowsills quietly collect dust, dead bugs, and sometimes even mold—especially in those corners where condensation lingers. Wipe them down with an all-purpose cleaner or a mix of vinegar and water. If you have wooden sills, follow up with a light polish or wood conditioner to protect the surface.
A Breath of Fresh Air
Spring cleaning isn’t just about tidying up—it’s about creating a home that feels renewed. Taking time to tackle these less-obvious areas can bring surprising satisfaction and a true sense of cleanliness.
So roll up your sleeves, open those windows, and let the fresh air (and light) flow freely again!
There’s nothing quite as off-putting as reaching for your favorite cup only to find it tastes or smells like soap, despite having just gone through the dishwasher. If you’ve noticed this problem with your dishes, you’re not alone! It’s a common issue, but the good news is that it’s usually fixable. Here are three simple steps to stop your cups from coming out of the dishwasher smelling and tasting like soap.
1. Check Your Dishwasher Detergent
The first thing to look at is the detergent you’re using. Too much detergent or a low-quality detergent can often leave residue on dishes, especially in the form of a soapy taste and smell. Here’s what to do:
Use the correct amount of detergent: Overusing detergent can lead to soap buildup, which ends up on your dishes. Check the detergent packaging for recommendations based on your water hardness.
Switch to a high-quality detergent: If you’re using a budget detergent, it might not rinse off as well, leaving residue behind. Consider switching to a high-quality brand or one that’s specially formulated for your dishwasher type.
Rinse aid: If your dishwasher doesn’t have a built-in rinse aid function, try using a rinse aid product. Rinse aid helps ensure that all detergent is washed away and leaves dishes sparkly clean without any soap residue.
2. Clean Your Dishwasher Regularly
Sometimes, the issue might not be with the detergent itself but with your dishwasher. If the machine is dirty or has soap buildup inside, it can transfer those smells and tastes onto your dishes. Here’s how to fix it:
Clean the dishwasher filter: Most dishwashers have a filter that can catch debris and food particles. Over time, this filter can get clogged and cause a buildup of grime. Remove and clean the filter regularly (about once a month) to keep things running smoothly.
Run a cleaning cycle: Many dishwashers have a dedicated cleaning cycle. Use this cycle with a dishwasher cleaner or white vinegar to remove mineral buildup, soap scum, and odors. Run the cycle with the dishwasher empty to give it a thorough cleanse.
Check for mold or mildew: If your dishwasher has a persistent odor, it might be caused by mold or mildew buildup, often found in hidden crevices. Wipe down the interior of the dishwasher with a vinegar solution or a specialized cleaner to eliminate any fungal growth.
3. Use the Right Dishwasher Setting
Not all dishwasher cycles are created equal. Sometimes, if you’re using a cycle that doesn’t get your dishes clean enough, detergent can be left behind, contributing to that soapy taste. Here’s what to do:
Choose a heavier cycle for tougher loads: If you’re washing cups that have stubborn residue, try using a more intensive cycle. It will give the detergent more time to break down food particles and soap, ensuring better rinse results.
Make sure the spray arms aren’t clogged: If the spray arms in your dishwasher aren’t rotating or spraying evenly, detergent can remain on your dishes. Regularly check that the spray arms are free from obstructions, such as food particles or mineral buildup.
Ensure proper water temperature: Hot water helps the detergent dissolve and rinse away properly. If your dishwasher isn’t heating the water to the correct temperature (usually between 120-150°F), it may not be rinsing thoroughly, leaving behind soap residue. If your dishwasher allows for temperature adjustment, make sure the setting is optimal.
Bonus Tip: Wash Cups Separately
If your cups are especially sensitive to soap residue, try washing them separately from dishes that are more likely to leave residue behind, like pans with grease. This will prevent soap buildup on the cups and keep them tasting and smelling fresh.
It’s frustrating when your cups come out of the dishwasher with a soapy taste, but by adjusting your detergent use, keeping your dishwasher clean, and using the right settings, you can say goodbye to that unpleasant smell and taste. These simple fixes will ensure your cups—and all your dishes—come out perfectly clean and ready to use.
Pro tip: If the problem persists after trying these steps, it could be worth checking your dishwasher’s performance or contacting a professional to ensure everything is functioning correctly.
As pet owners, we all want to make life easier for both ourselves and our furry companions. From feeding to grooming, we are constantly thinking of ways to improve their lives. One solution that’s become increasingly popular in recent years is installing a doggy door. While it might seem like a simple addition, a doggy door offers a host of benefits for both pets and their owners.
Here’s why having a doggy door might just be one of the best decisions you make for your household.
1. Freedom for Your Furry Friend
Perhaps the most obvious benefit of a doggy door is the freedom it provides to your dog. No longer will your pet have to wait for you to open the door so they can relieve themselves or get some fresh air. For active dogs, this can be a game-changer, allowing them to explore the backyard or enjoy outdoor playtime without you having to constantly supervise or open the door.
This added independence can be especially beneficial for working professionals or those with a busy schedule. With a doggy door, your pet can go in and out as they please, reducing the chances of accidents in the house and giving them more space to burn off energy.
2. A More Convenient Life for You
If you’ve ever had to get up in the middle of the night to let your dog out, you’ll know that the convenience of a doggy door cannot be overstated. No more midnight trips to the door! Whether it’s a quick bathroom break or simply a desire to get some fresh air, your dog can do it all on their own. This can save you time, energy, and the hassle of getting dressed or braving the cold to let your dog out.
Additionally, if you have a puppy or a senior dog, a doggy door can be a great way to ease their transition to potty training or make life more comfortable for them as they age.
3. Reduced Stress for Pets
For dogs who experience separation anxiety or stress when left alone, a doggy door can offer some relief. Having the ability to move freely between the inside and outside of the house allows them to escape from stressful situations, such as being confined to a room or left in a crate for too long.
Plus, the ability to get outside for fresh air or to lounge in a sunny spot can help keep their stress levels lower when they’re home alone. They’ll appreciate the autonomy and comfort that comes with having access to their environment.
4. Improved Health and Well-being
Dogs are naturally active animals, and regular exercise is key to keeping them happy and healthy. Having a doggy door makes it easier for them to get the exercise they need, whether it’s by running around the yard or just exploring the outside world. This can help prevent obesity and improve overall health, especially for dogs who have high energy levels.
Additionally, for dogs that are sensitive to being indoors for long periods (especially during colder months), a doggy door allows them to go outside for bathroom breaks, which can help with digestive health and prevent urinary issues.
5. Peace of Mind for Pet Owners
A doggy door offers peace of mind because it provides your dog with the freedom to go outside as needed without you having to keep a close eye on them every second. You’ll feel less anxious about your dog being cooped up inside for hours, especially if you’re gone for long periods of time.
And for dog owners who live in areas with extreme weather, many modern doggy doors come with weatherproof features to prevent drafts or the elements from entering your home, ensuring that your space remains comfortable year-round.
6. Easy Installation and Customization
Doggy doors have come a long way from the basic flap models of the past. Today, there are a variety of options to suit your home and your pet’s needs. From manual flaps to automatic doors with microchip sensors, there’s a doggy door for every type of household and lifestyle.
Installation is relatively easy, especially with some of the more modern options that are designed to fit into existing doors or walls. Many pet stores and home improvement centers offer options for different types of doors, and professional installation can often be arranged for a more seamless experience.
7. Enhancing Your Relationship with Your Pet
Having a doggy door also enhances the bond you share with your pet. With the added convenience, both you and your dog will feel less stressed, making the relationship more enjoyable and fulfilling. Your dog will appreciate the added freedom, and you’ll appreciate not having to constantly cater to their needs.
Is a Doggy Door Right for You?
If you’re considering adding a doggy door to your home, take into account your pet’s personality, your home’s layout, and your lifestyle. Some pets love the freedom and convenience that a doggy door offers, while others may take a little time to get used to it.
But once your pet adjusts, you’ll likely find that it’s one of the best additions you can make for your home. Not only does it give your pet more autonomy, but it also makes life much more convenient for you as a pet owner.
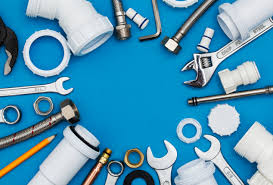
Keeping your plumbing and water systems in top shape is crucial for avoiding unexpected problems and ensuring everything runs smoothly. Regular maintenance can help extend the life of your appliances, prevent costly repairs, and improve the efficiency of your home. Here are some key plumbing and water maintenance tasks you can easily tackle to keep things flowing without a hitch.
1. Check the Water Softener and Replenish Salt if Necessary
If you have a water softener, it’s important to check the salt level regularly. Hard water can leave deposits on your pipes, faucets, and appliances, which can lead to clogs, mineral buildup, and reduced efficiency. The water softener works by removing minerals like calcium and magnesium, and replenishing the salt ensures that it continues to function properly.
To maintain your water softener:
Open the salt tank and check the level. If it’s low, add more salt, making sure you use the recommended type (usually sodium chloride or potassium chloride).
Clean the tank every six months to remove any salt bridges or clumps that can block the salt from dissolving properly.
If you notice an increase in water hardness or residue build-up, consider recharging or servicing your softener.
2. Clean the Garbage Disposal
Garbage disposals are a convenient tool for eliminating food waste, but they can easily develop odors or get clogged. A simple cleaning routine can keep it working efficiently and smelling fresh. Here’s how you can clean your garbage disposal:
Grind ice cubes: Fill the disposal with ice cubes and turn it on. Grinding the ice helps dislodge debris and sharpens the blades.
Flush with hot water: Run hot water through the disposal after grinding the ice to clear away any remaining bits of food and residue.
Baking soda and vinegar: Pour ½ cup of baking soda followed by ½ cup of vinegar into the disposal. Let it sit for a few minutes, then flush with hot water. This helps break down grease and neutralize odors.
For an extra boost, consider using lemon peels or a disposal cleaning product specifically designed to combat odors and residue.
3. Inspect Tub and Sink Drains for Debris; Unclog if Necessary
Clogged drains are one of the most common plumbing issues homeowners face. Whether it’s hair in the bathroom or food particles in the kitchen, buildup in drains can slow down water flow and lead to bigger blockages over time. Here’s what you can do to keep your drains running smoothly:
Remove visible debris: For tub and sink drains, start by inspecting the drain covers and removing any visible hair, soap scum, or debris that may be blocking the flow.
Use a drain snake or plunger: If you notice slow drainage, try using a drain snake or plunger to dislodge the obstruction. For tougher clogs, a mixture of baking soda and vinegar can help break down buildup.
Preventive measures: Consider using drain catchers in sinks and tubs to collect hair and other debris before it enters the drain. This can prevent clogs from forming in the first place.
Regular drain cleaning can prevent buildup from turning into a major plumbing headache.
4. Flush Out Hot Water from the Water Heater
Over time, sediment and minerals from hard water can accumulate in the bottom of your water heater tank, which can affect its efficiency and lifespan. Flushing the water heater helps remove this sediment, ensuring it operates efficiently and extends its life.
To flush your water heater:
Turn off the power and water supply: For electric water heaters, turn off the power at the breaker. For gas heaters, set the thermostat to the lowest setting. Turn off the water supply to the heater.
Attach a hose to the drain valve: Place the other end of the hose in a drain or outside where the water can flow out safely.
Open the drain valve: Allow the water to flow out, taking any sediment with it. You might hear a gurgling sound or notice some cloudy water at first.
Flush with clean water: Once the water runs clear, turn the water supply back on to rinse the tank.
Close the valve and restore power: Once you’ve finished, close the drain valve, remove the hose, and turn the water and power supply back on.
Flushing the tank once a year helps maintain the efficiency of your water heater and prevent issues like reduced heating capacity or premature failure.
Regular Maintenance Saves Time and Money
Taking care of your plumbing and water systems is an essential part of homeownership. By checking and replenishing your water softener, cleaning the garbage disposal, unclogging drains, and flushing out your water heater, you can avoid costly repairs and improve the overall efficiency of your home’s water system. With these simple tasks, you can keep your home running smoothly and enjoy peace of mind knowing that you’re preventing bigger problems down the road.
Managing a household can be overwhelming with a never-ending list of tasks and responsibilities. Between work, family, and personal life, it can feel like there’s no time left to keep things running smoothly at home. But what if you could simplify things? Here are three effective ways to make managing your house easier, less stressful, and more efficient.
1. Create a Routine for Daily Tasks
One of the best ways to prevent your house from becoming overwhelming is by establishing a daily routine. Small tasks, when done consistently, make a big difference. Instead of waiting for the mess to pile up, tackle it every day.
Daily habits to consider:
Make the bed: Starting your day by making your bed sets a positive tone for the rest of your tasks.
Do the dishes: Cleaning up after meals, even if it’s just a few dishes, helps keep your kitchen from getting cluttered.
Tidy up: Spend 10-15 minutes each day picking up any items that don’t belong in a room. A quick tidy-up is much less daunting than trying to clean up an entire room at the end of the week.
These small tasks, done daily, prevent them from snowballing into a bigger job. Plus, keeping up with them makes it easier to maintain a clean home, reducing the stress that comes with clutter and disorganization.
2. Declutter Regularly
Clutter can make a home feel chaotic and difficult to manage. When you have too much stuff, it takes more time and effort to keep everything organized. By decluttering regularly, you’re able to keep things simpler and more manageable.
How to declutter effectively:
Start small: Begin with one area, like your closet or the kitchen counters, and go through your belongings. Sort items into categories: keep, donate, or discard.
One-in, one-out rule: For every new item you bring into your home, commit to getting rid of something old. This helps you maintain a manageable amount of possessions without feeling like you’re constantly overwhelmed by things.
Tackle it periodically: Set aside time every couple of months to go through different areas of your home. This could be as simple as a few minutes each weekend or a bigger project every season.
Regularly clearing out what you no longer need or use will create a more organized space. Plus, you’ll find that you can easily locate the things you truly need, saving time in the long run.
3. Automate Where Possible
In today’s world, technology can be your best friend when it comes to simplifying home management. Automating tasks or setting up systems that require less hands-on work will save you time and energy. It’s like having a personal assistant for your home!
Ways to automate home management:
Automate bill payments: Set up automatic payments for utility bills, subscriptions, and even mortgage or rent payments to reduce mental load and the risk of late fees.
Use smart home devices: Smart thermostats, lights, and locks can be controlled from your phone, helping you manage your home’s comfort and security with ease.
Schedule regular cleaning: Whether it’s scheduling a cleaning service to handle deeper cleaning tasks or using a robotic vacuum to take care of the floors, automation can save hours of your time each week.
By using technology to handle repetitive tasks, you free up time to focus on other aspects of life. Plus, you’ll feel a sense of relief knowing that these things are taken care of without you having to constantly think about them.
Managing a home doesn’t have to feel overwhelming. By establishing a simple routine, decluttering regularly, and automating tasks wherever possible, you’ll find that maintaining a home becomes easier and more efficient. Instead of feeling buried under a mountain of responsibilities, you can enjoy the space you’ve created, knowing that your home is organized and under control.
Small changes can make a big impact. Start today and see how simplifying your home management leads to a more peaceful, enjoyable life.
As winter fades and the days grow longer, your lawn begins to awaken from its dormant state. It’s the perfect time to start thinking about how to rejuvenate your yard and prepare it for the vibrant growth of spring. One of the best ways to do this is by fertilizing your lawn at the right time, giving it the nutrients it needs to thrive in the warmer months.
Why Fertilizing Matters
Fertilizing your lawn is essential for ensuring healthy, green grass. After months of cold weather and limited growth, your lawn can be depleted of nutrients, and the soil may be lacking in the essential elements it needs for strong, lush grass. Fertilizer helps replenish these nutrients, promoting healthy root development, strong growth, and vibrant color.
When to Fertilize Your Lawn
Timing is crucial when it comes to fertilizing. Fertilizing too early can encourage growth before the ground has warmed up, which can lead to weak, leggy grass. Fertilizing too late may miss the window for optimal growth. Here’s how to determine the best time to fertilize:
Early Spring (March to April)
As the weather warms up and the snow begins to melt, your lawn is likely emerging from its winter dormancy. This is the ideal time for your first round of fertilization. Aim to apply a balanced fertilizer in early spring, just as the grass begins to show signs of growth. This will jumpstart the growing season and help your lawn recover from the cold months.
Late Spring (May)
In late spring, your lawn is actively growing, and it’s time for a second round of fertilization. This round should provide more nitrogen to encourage lush, green growth. By fertilizing at this time, you’ll promote thick, healthy grass that can better withstand the heat of summer.
How to Fertilize Your Lawn
When applying fertilizer, be sure to follow these tips for the best results:
Choose the Right Fertilizer: Select a fertilizer that matches your lawn’s needs. A slow-release, balanced fertilizer is often a good choice for lawns in early spring.
Apply Evenly: Use a spreader to apply the fertilizer evenly across your lawn. Avoid over-applying, as this can cause burning and damage to the grass.
Water After Fertilizing: After applying fertilizer, water your lawn thoroughly to help the nutrients absorb into the soil and reach the roots.
Consider Soil Testing: If you’re unsure about the nutrient levels in your soil, consider getting a soil test. This can help you choose the right type of fertilizer and avoid over-fertilizing.
Other Spring Lawn Care Tips
In addition to fertilizing, there are a few other lawn care tasks to consider as you prepare your yard for the warmer months:
Aerate Your Lawn: Aerating your lawn helps improve soil compaction and allows air, water, and nutrients to reach the roots more effectively.
Rake Up Debris: Remove leaves, sticks, and other debris that have accumulated over the winter. This allows your grass to breathe and reduces the risk of mold and fungus.
Water Wisely: As your lawn begins to grow, make sure to water it properly. Early morning watering is the best time, as it prevents the lawn from staying too wet overnight.
Spring is a time of renewal and growth, and fertilizing your lawn at the right time is essential for a healthy, beautiful yard. By fertilizing early in the season and providing the right nutrients, you’re setting your lawn up for success as it emerges from winter and heads into the vibrant months of spring. Take the time to care for your lawn now, and enjoy a lush, green space all season long! 🌱