Rugs can completely transform a space—they add warmth, style, and comfort. But they can also be a hazard if they slip or bunch underfoot. That’s where a good non-slip rug pad comes in.
A high-quality pad keeps your rugs securely in place, so you don’t have to worry about tripping or sliding during everyday use. Whether you’re rushing to answer the door, chasing after kids, or just walking around in socks, a rug pad provides the stability you need.
But the benefits go beyond safety. A non-slip pad also protects your floors from wear and tear. High heels, active children, or moving furniture can all damage hardwood, laminate, or tile floors over time. By placing a pad under your rug, you create a cushion that absorbs impact and prevents scratches, dents, or scuffs.
Pro Tip: Look for pads that are easy to trim to fit your rug’s size and made from materials that won’t stain or stick to your flooring. This ensures maximum grip without any damage.
In short, a non-slip rug pad is a small investment that brings big peace of mind—protecting your floors and keeping your home safe and comfortable for everyone who lives there.
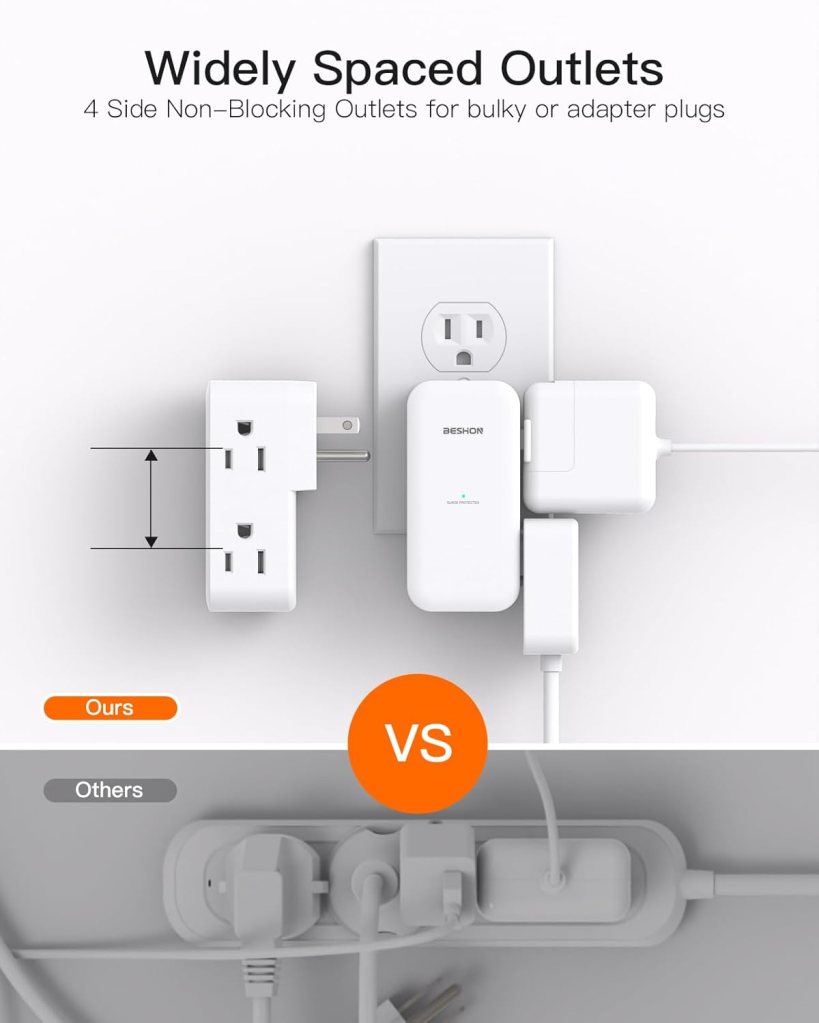
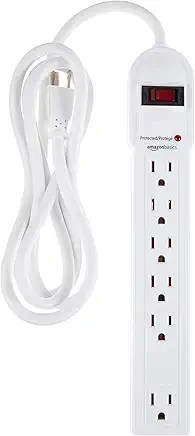
If you’ve ever tried to charge multiple devices in a tight corner of your home, you know the struggle—plugs bumping into each other, cords tangling, and some devices not fitting at all. That’s where a rotating surge protector outlet extender becomes a game-changer.
These clever gadgets not only protect your devices from power surges, but their rotating outlets allow you to plug in bulky chargers, vacuums, and other large adapters without blocking neighboring plugs. In small spaces like laundry rooms, closets, or behind furniture, they make what seemed impossible completely doable.
Here’s why I love them: I can charge my cordless vacuum, plug in a phone charger, and power a lamp—all in one outlet. The rotating design means I don’t have to contort cords or rearrange furniture. Plus, surge protection gives peace of mind for pricey devices.
Tips for using a rotating surge protector effectively:
Check the wattage: Make sure your devices don’t exceed the extender’s rating.
Keep it accessible: Place it where it’s easy to rotate the plugs without unplugging everything.
Use it for high-draw devices: Vacuums, heaters, or power tools often need more space—rotating extenders make it possible.
Avoid daisy-chaining: Don’t plug one extender into another; it can be a fire hazard.
For anyone dealing with cramped corners or multiple devices, a rotating surge protector outlet extender is a small investment with a big impact. It keeps your space organized, your devices safe, and your cords untangled—a win-win for any home.
Moving into a new home is exciting — new walls to paint, new furniture to arrange, and a fresh start. But sometimes, there’s an unwelcome surprise waiting for you: a lingering odor that screams “previous pet lived here.” Whether it’s the unmistakable scent of dog, cat, or something less identifiable, these smells can make your beautiful new space feel less like home and more like a challenge.
So what can you do when that “old dog smell” just won’t quit? Enter the ozone machine — a powerful tool that many homeowners and professional cleaners use to tackle tough odors and refresh living spaces.
What Is an Ozone Machine?
An ozone machine, or ozone generator, produces ozone (O₃), a molecule made up of three oxygen atoms. It might sound technical, but what it really means is this: ozone is a strong oxidizer that can break down stubborn odors caused by smoke, pets, mold, and bacteria.
In other words, it’s like a microscopic cleaning crew attacking those molecules that cause unpleasant smells and neutralizing them.
How Does It Work?
Ozone machines release ozone gas into the air. This gas interacts with odor-causing particles, breaking them apart and removing the smell rather than just masking it. That’s why ozone machines can be much more effective than traditional air fresheners or sprays.
Important Safety Tips
Before you rush to rent or buy an ozone machine, here’s the kicker: ozone can be harmful to breathe in high concentrations. You should never use an ozone machine in an occupied space — meaning no people, pets, or plants during the treatment.
Typically, you’ll want to:
Seal off the room or house.
Run the ozone machine for a set amount of time (usually a few hours).
Ventilate the space thoroughly afterward.
Wait until the ozone dissipates before moving back in.
When Is It a Good Idea?
You’re moving into a home with a strong pet odor.
You want to tackle cigarette smoke or cooking smells that have settled deep into carpets, walls, or furniture.
You’re prepping a house for sale and want it smelling fresh for potential buyers.
When to Skip It?
If you or someone in your household has respiratory issues (asthma, allergies, etc.).
If you don’t have the time or ability to safely ventilate the home afterward.
If the odor is caused by mold or moisture — in that case, fixing the source is more important than just masking the smell.
That stubborn pet odor after moving in can feel like a huge hassle, but with the right tools — including an ozone machine — you can reclaim your fresh start and breathe easy again.
Just remember: ozone machines aren’t magical “plug and play” devices. Using them safely and correctly is key. When in doubt, consult a professional or do your research before diving in.
Let’s talk about one of the simplest, most overlooked safety upgrades you can make to your home. It costs less than a fancy cup of coffee, takes five minutes, and could make a huge difference if someone ever tries to force their way through your front door.
Ready?
Replace those tiny screws in your door frame plates with 4-inch ones.
That’s it. That’s the tip.
But wait—let me explain why this tiny upgrade packs a big punch.
Why Your Door Isn’t as Secure as You Think
Most exterior doors come with a strike plate (that metal piece your door latch clicks into) and hinge plates—installed with laughably short screws. We’re talking half an inch to maybe an inch long. That means those screws are only anchoring into the flimsy door frame trim—not the sturdy wall studs.
Translation? If someone gives your door a good shoulder bash (or a well-placed kick), that strike plate could tear right out. Scary, right?
The 4-Inch Screw Fix
Here’s what you do:
Open your front (or back) door.
Take a screwdriver or drill and remove the short screws from the strike plate and hinge plates.
Replace them with 3.5- or 4-inch wood screws.
Make sure they bite deep into the wall stud behind the trim.
Just like that, your door is now far more resistant to brute force. Instead of the strike plate flying off with the door frame splintering like a toothpick, it’s got serious reinforcement backing it up.
Longer screws in the hinges help keep the door on the hinges if someone tries to kick it down.
When I Did This, I Slept Better
I made this change after seeing a video of a guy breaking down a door in under five seconds. FIVE. SECONDS.
That night, I rummaged through the garage, found some 4-inch wood screws, and got to work. It took maybe ten minutes total. Then I sat down on the couch and thought, That’s probably the most valuable ten minutes I’ve spent all week.
I’m not saying this is a substitute for a security system. But it’s a smart layer of defense—the kind of simple home improvement that pays for itself in peace of mind.
We spend so much time upgrading things like smart thermostats and fancy appliances. But sometimes, the smartest upgrades are the ones no one sees—the ones that keep your home (and everyone in it) safe.
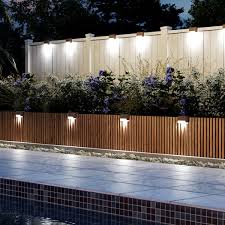
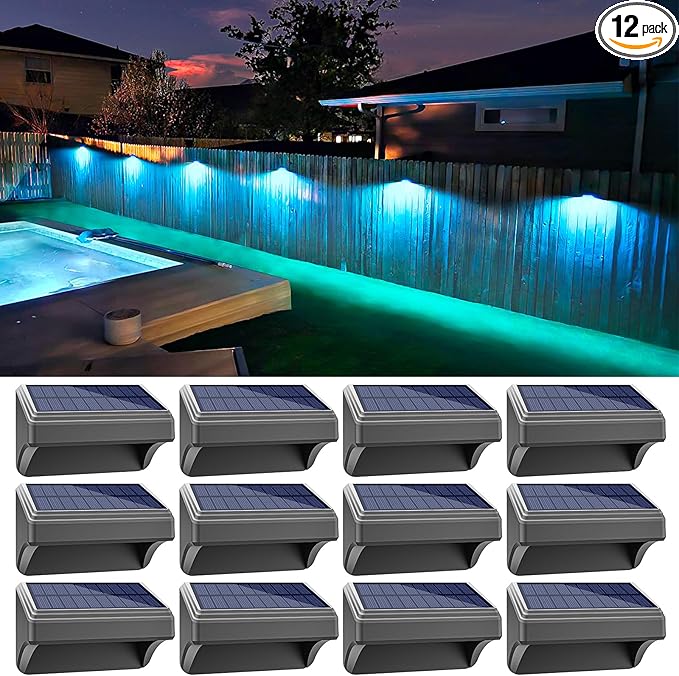
When it comes to improving your outdoor space, sometimes the simplest additions make the biggest impact. Installing solar lights on your fence or outdoor stairs is a smart, affordable, and eco-friendly way to add charm, safety, and functionality to your yard.
Why Choose Solar Lights?
No wiring required – Solar lights are powered by the sun, so there’s no need to hire an electrician or deal with tangled wires.
Energy-efficient – They charge during the day and automatically light up at night, saving energy and lowering utility bills.
Low maintenance – Once installed, they require minimal care beyond the occasional cleaning.
Stylish and versatile – From sleek modern designs to rustic lantern looks, there’s a solar light to match your style.
Fence Lighting: Subtle Beauty + Security
Adding solar lights along your fence gives your yard a warm, inviting glow while improving visibility. It also helps define your property line at night, adding a subtle layer of security.
💡 Tip: Space lights evenly for a balanced look, and choose weather-resistant models for durability.
Stair Lighting: Safety First
Outdoor stairs can be tricky to navigate at night. Solar lights mounted on or beside steps can prevent trips and falls while creating a cozy, welcoming atmosphere.
💡 Tip: Install lights at a low angle to softly illuminate each step without creating glare.
A Small Addition with Big Impact
Solar lights are an easy DIY upgrade that instantly boosts your home’s curb appeal, safety, and functionality. Whether you’re entertaining guests or simply enjoying a quiet evening outdoors, you’ll appreciate the added glow.
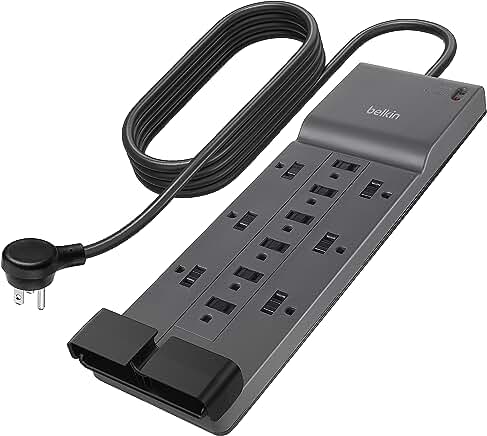
In many parts of the country, summer doesn’t just mean sunshine and barbecues—it also means thunderstorms. And with those storms often come power outages and electrical surges.
A friend recently experienced this firsthand. During a quick but intense storm, their power went out. When it came back on, their treadmill—a key part of their home workout routine—stopped working properly. It was a frustrating and costly reminder of something simple: the importance of using a surge protector.
Electronics, appliances, and even fitness equipment like treadmills and stationary bikes are vulnerable to power surges. Without a surge protector, one storm can do serious damage.
So here’s a quick reminder: ✔️ Use surge protectors for valuable or sensitive devices. ✔️ Unplug items during severe storms if you’re home and it’s safe. ✔️ Consider whole-house surge protection if outages are frequent in your area.
It’s a small investment that can save you big headaches—and expenses—later.
Ants may be tiny, but when they invade your home, they can cause a big nuisance. Whether they’re marching across your kitchen counter or showing up near your pet’s food bowl, ants always seem to find a way in. The good news? You can stop them—with the right mix of prevention, cleanliness, and a few smart tricks.
Here’s how to get rid of ants around your house—and keep them away.
1. Find the Source
Before you start spraying or setting traps, follow the trail. Ants are usually headed to a food or water source. Once you find their entry point, seal it if possible. Look for cracks in baseboards, windows, doors, and plumbing areas where they might be sneaking in.
2. Clean Up the Attraction
Ants don’t invade for fun—they’re searching for food. Keep your kitchen counters, floors, and pantry clean and crumb-free. Wipe up sticky spots, keep food sealed in containers, and don’t leave pet food out all day. Even a little moisture, like water around the sink, can attract them.
3. Use Natural Repellents
There are several natural remedies you can try before reaching for chemicals. Ants hate strong scents like:
Vinegar: Mix equal parts vinegar and water in a spray bottle. Spray it along ant trails and entry points.
Cinnamon or cloves: Sprinkle around baseboards or entry points to repel ants.
Lemon juice: Disrupts their scent trails and smells great.
4. Set Bait Traps
If the ants persist, bait traps can be effective. They bring poison back to the colony, eliminating the source. Just be cautious if you have pets or small children—keep traps out of reach.
5. Seal Up Entry Points
Once the ants are gone, prevent a future invasion by sealing gaps around windows, doors, and foundation cracks. Use caulk or weatherstripping where needed.
6. Know When to Call a Pro
If the problem continues or the infestation is large, it might be time to call a pest control professional. They can safely identify the ant species and apply targeted treatments.
The best way to stop ants is to make your home less inviting in the first place. A clean kitchen, sealed entry points, and the occasional natural repellent can go a long way. Don’t let these tiny intruders take over—show them the door for good.
Your washing machine works hard, day in and day out, to keep your clothes fresh and clean. But like any appliance, it needs some TLC to keep performing at its best. Over time, detergent residue, dirt, and even mold can build up inside, affecting both the machine’s efficiency and your laundry. So, how often should you clean your washing machine to ensure it’s working properly?
Why You Should Clean Your Washing Machine
Your washing machine isn’t just responsible for cleaning your clothes—it also needs to be cleaned itself. Here’s why:
Prevent Build-Up: Over time, detergent, fabric softener, and dirt can build up in the drum, pipes, and seals. This can lead to unpleasant odors and potential mold growth.
Maintain Efficiency: A clean machine operates more efficiently, using less energy and water. This can save you money in the long run.
Extend Lifespan: Regular cleaning can help prevent costly repairs and extend the life of your washing machine.
How Often Should You Clean Your Washing Machine?
The frequency of cleaning your washing machine depends on several factors, including how often you use it and the type of laundry detergent you use. Here’s a general guideline to follow:
Monthly Cleaning For most households, cleaning your washing machine once a month is a good rule of thumb. This can help eliminate soap scum, mold, and bacteria that build up over time. If you use your washing machine daily, you might want to clean it more frequently.
After Every Few Loads (for Front-Load Washers) Front-load washers are especially prone to mold and mildew because of their airtight door seals. After every few loads, wipe down the door seal and leave the door ajar to allow the interior to air out. This can prevent the growth of mold.
When You Notice Odors If your washing machine starts to smell musty or funky, it’s time for a deep clean. A bad odor can be a sign of mold, mildew, or detergent residue. If this happens, give your washing machine an extra cleaning to get rid of the smell.
Every 6 Months (Deep Clean) In addition to monthly cleanings, it’s a good idea to perform a deep clean every six months. This includes cleaning the drum, the detergent drawer, and the filter. This is especially important if you use a washing machine regularly or have hard water, as mineral build-up can affect its performance.
How to Clean Your Washing Machine
Cleaning your washing machine doesn’t have to be difficult. Here’s a simple process you can follow:
Run an Empty Cycle with Hot Water Set your washing machine to the hottest water setting and run an empty cycle. Add two cups of white vinegar to the drum. This helps disinfect and remove soap scum and odors.
Wipe Down the Drum and Seal After the cycle is complete, wipe down the inside of the drum with a clean cloth. Don’t forget to wipe around the door seal and around the detergent drawer, as these areas can accumulate grime and mildew.
Clean the Filter and Detergent Tray Remove and clean the detergent tray regularly to remove any detergent build-up. Clean the filter (if applicable) to remove lint, dirt, and other debris.
Leave the Door Open After cleaning, leave the door open for a while to let the inside of the machine dry completely. This helps prevent the growth of mold and mildew.
Tips for Maintaining a Clean Washing Machine
Use the Right Detergent: Always use the recommended amount of detergent. Too much detergent can lead to a build-up of soap residue.
Don’t Overload: Overloading your washing machine can result in poor cleaning and excess moisture left in the drum. Make sure to leave enough space for clothes to move freely.
Check the Drain Hose: Ensure that the drain hose isn’t clogged, as this can prevent proper drainage and lead to water pooling in the machine.
Use a Washing Machine Cleaner: There are also specialized washing machine cleaners available that can help break down build-up. Use these as directed for extra cleaning power.
Cleaning your washing machine regularly is essential for keeping it in good working condition and extending its lifespan. While a monthly cleaning should be sufficient for most households, take care to clean certain areas more frequently (like the door seal and detergent tray) to keep odors at bay. By following a simple cleaning routine, your washing machine will continue to provide you with fresh, clean clothes for years to come.
Our homes are more than just a place to rest our heads; they are our sanctuaries—spaces where we unwind, recharge, and foster our emotional well-being. In today’s fast-paced world, creating a home environment that nurtures our mental health has never been more important. Whether you’re designing a new space or rearranging what you already have, there are simple, effective ways to create an environment that promotes relaxation, creativity, and mental peace.
1. Embrace Natural Light
Natural light has a profound impact on our mood and mental clarity. Sunlight boosts serotonin levels, helping to combat feelings of anxiety and depression. To harness the power of natural light in your home, open up curtains or blinds during the day and consider placing mirrors strategically to reflect light around the room. If you live in a space with limited natural light, consider using full-spectrum light bulbs or light therapy lamps that simulate daylight.
2. Declutter Your Space
Clutter can cause stress, anxiety, and a feeling of being overwhelmed. To create a peaceful environment, prioritize organization. Keep your home tidy by creating systems for storing everyday items and getting rid of unnecessary things. You don’t need to have a minimalist approach, but a home that is organized and clutter-free provides more mental space for relaxation and creativity. Consider adding storage solutions like baskets, shelves, or storage ottomans to reduce visual clutter.
3. Incorporate Calming Colors
The colors in your home can influence your emotional state. Soft, neutral colors like pastels or earthy tones promote relaxation, while bold and vibrant colors can evoke energy and creativity. For spaces meant for rest and relaxation, such as bedrooms or living rooms, opt for soothing colors like light blues, soft greens, and warm neutrals. If you want to stimulate creativity, consider a splash of energizing colors like yellow or orange in your home office or creative nook.
4. Bring in Nature
Nature has a calming effect on the mind. Bringing the outdoors inside can help reduce stress and create a more peaceful home environment. You can add houseplants, flowers, or natural elements like wood and stone to your décor. Plants such as aloe vera, peace lilies, or spider plants not only add beauty to your home but also improve air quality, which further supports mental well-being. Nature-inspired décor, such as artwork featuring landscapes, can also enhance the mood of any room.
5. Create Spaces for Relaxation
Designate areas in your home specifically for relaxation. A cozy reading nook, a meditation corner, or a comfortable spot by the window can help you unwind and recharge. Add soft furniture, cozy throws, and calming accessories like scented candles, diffusers, or soft music to set the mood. These spaces offer a sanctuary where you can escape from the stresses of daily life and focus on your mental health.
6. Promote Movement and Activity
Your home should also support physical well-being, as physical health and mental health are deeply connected. Create spaces where you can engage in physical activity, whether it’s a small yoga area, a home gym, or a spot for dance or stretching. Staying physically active helps to reduce stress, boosts mood, and improves overall mental health. Even adding an area to stretch or take a short walk can help increase your emotional well-being.
7. Personalize Your Space
Personalization is key to making your home feel like a reflection of yourself. Surround yourself with items that bring you joy, comfort, and peace. Whether it’s family photos, favorite artwork, or meaningful objects, these personal touches can foster a sense of belonging and emotional connection. Personalizing your space helps you feel grounded and supported, creating a positive atmosphere that nurtures your mental health.
8. Mind the Sounds
Noise pollution, even in your own home, can increase stress levels and hinder relaxation. To promote peace, think about the sounds in your environment. Consider incorporating soothing sounds like gentle music, nature sounds, or white noise. Soft background music can enhance relaxation, while silence can help you recharge. If your space is noisy, invest in noise-canceling headphones or soundproofing to reduce unwanted distractions.
9. Simplify Your Space
A home that reflects simplicity can help reduce mental clutter. Aim for a design that’s clean and uncluttered, allowing for a sense of calm and ease. Avoid overcrowding rooms with too much furniture or excessive decorations. Keep it simple by choosing key pieces that offer function and beauty. A simpler space gives the mind a chance to relax, making it easier to find peace and tranquility.
10. Use Aromatherapy
Certain scents can have a calming effect on the mind and body. Consider using essential oils or scented candles in your home to create an atmosphere of relaxation. Lavender, chamomile, and eucalyptus are all known for their soothing properties. Aromatherapy can also help with concentration and mental clarity, making it a great addition to your home office or study area.
Your home should be a space that supports and nurtures your mental well-being. By creating an environment that promotes relaxation, creativity, and peace, you can transform your home into a sanctuary for both your body and mind. Incorporate natural light, calming colors, and elements of nature, and prioritize spaces for relaxation and physical activity. In doing so, you’ll create a space where you can thrive emotionally and find the balance needed to live your best life.
Did you know that over half of Americans have never tested their water? Winter is an ideal time to make sure you’re not overlooking the quality of the water you use every day, from drinking and cooking to showering and cleaning. Testing your water can not only improve your health but can also save you money on plumbing repairs, maintenance, and appliance longevity.
Why Test Your Water?
One common water issue is hard water, which contains high levels of minerals like calcium and magnesium. While these minerals might not be harmful to your health, they can cause significant damage to your home. Hard water leads to:
Mineral buildup on faucets, showerheads, and appliances, making cleaning more difficult.
Scaling in plumbing pipes and water heaters, reducing the lifespan of your plumbing system and resulting in costly repairs or replacements.
Testing your water is the first step toward understanding what’s in your water and addressing any potential issues before they escalate.
How to Test Your Water
Testing your water is simple and can be done at home with a water testing kit. A great option to consider is the Safe Home Drinking Water Test Kit, which consistently ranks highly in reviews. This kit allows you to send a water sample to an EPA-certified lab, where it will be analyzed for a variety of contaminants such as lead, chlorine, bacteria, and hardness levels.
Once the lab tests your water, you will receive a detailed report outlining the quality of your water and potential risks. The results will help you understand the exact components of your water supply and what specific treatment it may need.
What to Do with Your Water Test Results
After receiving your water quality report, it’s time to make decisions about improving your water system. This might involve investing in a whole-house water filter, especially if you’re dealing with issues like hard water or contamination. Understanding your water’s unique characteristics is essential to selecting the right filtration system for your home.
For instance, if your water contains high mineral levels, a water softener might be necessary to protect your plumbing and appliances from the damaging effects of hard water. A whole-house filtration system can also address concerns like chlorine taste or the presence of harmful bacteria.
Pro Tip: Get Expert Advice
While testing your water is an important first step, it’s highly recommended that you seek the expertise of a water treatment professional. These experts can conduct further evaluations, test for other water quality factors that may not have been covered by your at-home kit, and provide recommendations for a customized treatment system based on your specific needs.
If you plan to start your spring garden soon, knowing your water’s quality will help you make informed choices about irrigation and fertilization. Some plants may not thrive with certain water contaminants, and a water filter may be just what you need to ensure the health and success of your garden.
Water testing is one of those small tasks that can make a big difference, both for your home and your health. As the winter months provide a perfect time to check on your water quality, taking the initiative now can save you significant trouble—and money—down the road. Plus, by proactively improving your water quality, you’ll be better prepared for the year ahead, whether that means enhancing your home’s water systems or boosting the success of your spring garden.