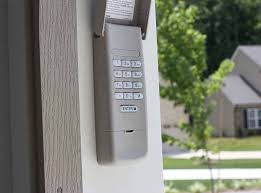
Why Your Fitted Sheet Keeps Popping Off—and How to Fix It

Is there anything more frustrating than waking up to find your fitted sheet has slipped off the corner of your bed again? You tug it back into place, but by the next morning—it’s popped off like a stubborn spring. If you’re tired of fighting with your sheets, you’re not alone.

Let’s talk about why it happens and, more importantly, how to fix it.

Why Do Fitted Sheets Come Off?

1. Your Sheet Isn’t the Right Size

The most common reason? The sheet just doesn’t fit. If it’s too small, it won’t stretch far enough to grip the mattress. Too big, and it bunches up and slides off.

💡 Fix: Always check the dimensions of your mattress—including the depth—and match it with your sheet size. Queen, King, and even California King mattresses can vary widely.

2. Mattress Too Deep (or Too Shallow)

Today’s mattresses often come with extra depth or plush toppers, but not all fitted sheets are made to handle that.

💡 Fix: Look for “deep pocket” or “extra deep pocket” fitted sheets, which are designed to stay put on thicker beds.

3. Elastic Has Worn Out

Over time, the elastic band on your fitted sheet may stretch out or lose its snap, making it ineffective.

💡 Fix: If the rest of the sheet is still in good shape, consider adding sheet suspenders (corner straps) or replacing the sheet with one that has reinforced elastic all around.

4. Slick Mattress Surface

Memory foam, latex, and smooth mattress protectors can make it hard for your fitted sheet to grip, especially if the sheet isn’t anchored securely.

💡 Fix: Use a grip pad under the sheet or opt for sheets made of materials with more friction, like brushed cotton or flannel.

5. You’re a Restless Sleeper

If you move a lot in your sleep, you’re naturally tugging on your sheets all night. Combine that with any of the issues above, and you’ve got a recipe for a popped corner.

💡 Fix: Again, deep-pocket sheets and sheet straps are your best friend here.

Make Your Bed Stay Made

We spend nearly a third of our lives in bed—so having bedding that actually stays in place makes a big difference in comfort, convenience, and even quality of sleep.

Investing in the right size sheets, adding simple reinforcements like straps, or upgrading your bedding setup can stop the nightly battle with your fitted sheet—for good.

Sweet dreams (with all corners intact)!

https://amzn.to/4lT1k4Y

The Advantages of Using a Vinyl Runner in the Kitchen

Your kitchen is one of the busiest places in your home. From meal prep to cleaning up spills, it takes a lot of foot traffic—and messes. That’s where a vinyl runner can make a big difference.

1️⃣ Protects Your Floors

A vinyl runner acts as a barrier between your floors and everyday wear and tear. It helps shield your hardwood, laminate, or tile from scratches, dents, and stains. This is especially helpful in front of sinks or stoves, where spills are most common.

2️⃣ Easy to Clean

Let’s face it: kitchens are messy. A vinyl runner can handle it. Unlike fabric rugs that absorb liquids and stains, vinyl runners wipe clean with a damp cloth or mop. No more worrying about dropping sauce or splashing water.

3️⃣ Slip-Resistant Safety

Many vinyl runners have a textured or non-slip backing to help them stay put. This can reduce the risk of slipping, especially when cooking or doing dishes. It adds peace of mind in a space where accidents can happen.

4️⃣ Comfort for Your Feet

Standing for long periods can be tough on your legs and back. A cushioned vinyl runner provides a little extra support underfoot, making kitchen tasks more comfortable.

5️⃣ Stylish and Practical

Vinyl runners come in many colors and patterns to match your kitchen décor. They add a sleek, finished look to your space while delivering practical benefits.

Small Upgrade, Big Impact

Adding a vinyl runner is an easy, affordable way to protect your floors, enhance comfort, and make cleanup a breeze. Give your kitchen the upgrade it deserves!

https://amzn.to/4kpaYLH

Brighten Your Yard: Add Solar Lights to Fences and Outdoor Stairs

When it comes to improving your outdoor space, sometimes the simplest additions make the biggest impact. Installing solar lights on your fence or outdoor stairs is a smart, affordable, and eco-friendly way to add charm, safety, and functionality to your yard.

Why Choose Solar Lights?

No wiring required – Solar lights are powered by the sun, so there’s no need to hire an electrician or deal with tangled wires.

Energy-efficient – They charge during the day and automatically light up at night, saving energy and lowering utility bills.

Low maintenance – Once installed, they require minimal care beyond the occasional cleaning.

Stylish and versatile – From sleek modern designs to rustic lantern looks, there’s a solar light to match your style.

Fence Lighting: Subtle Beauty + Security

Adding solar lights along your fence gives your yard a warm, inviting glow while improving visibility. It also helps define your property line at night, adding a subtle layer of security.

💡 Tip: Space lights evenly for a balanced look, and choose weather-resistant models for durability.

Stair Lighting: Safety First

Outdoor stairs can be tricky to navigate at night. Solar lights mounted on or beside steps can prevent trips and falls while creating a cozy, welcoming atmosphere.

💡 Tip: Install lights at a low angle to softly illuminate each step without creating glare.

A Small Addition with Big Impact

Solar lights are an easy DIY upgrade that instantly boosts your home’s curb appeal, safety, and functionality. Whether you’re entertaining guests or simply enjoying a quiet evening outdoors, you’ll appreciate the added glow.

https://amzn.to/3IqnSvq

Stay Cool This Summer: Why a Cooling Blanket Might Be Your Best Sleep Solution

When summer heat rolls in, getting a good night’s sleep can feel impossible. Tossing, turning, and waking up sweaty are all too common when temperatures rise. That’s where cooling blankets come in—a simple solution to help you sleep comfortably even on the hottest nights.

What is a Cooling Blanket?

A cooling blanket is designed with special fabrics or technologies that help regulate your body temperature. Unlike regular blankets that trap heat, cooling blankets wick away moisture, promote airflow, and feel cool against your skin. Materials like bamboo, cotton, or advanced fibers such as Outlast® and Eucalyptus are often used.

Benefits of Using a Cooling Blanket

Better Sleep Quality: Keeping your body at an optimal temperature helps you fall asleep faster and stay asleep longer.

Moisture-Wicking: Cooling blankets pull sweat away from your body, helping you stay dry and comfortable.

Lightweight Comfort: Many cooling blankets are thinner and more breathable, giving you that cozy feeling without overheating.

Great for Hot Sleepers: If you naturally sleep warm or experience night sweats, a cooling blanket can be a game changer.

Features to Look For

When shopping for a cooling blanket, consider:

  • Material: Look for natural, breathable fabrics like bamboo, cotton, or Tencel.
  • Weight: Choose a weight that feels comfortable but not stifling.
  • Ease of care: Many cooling blankets are machine washable for easy upkeep.

A cooling blanket is an affordable and effective way to improve your summer sleep. Whether you’re battling heatwaves or just want to stay comfortable, it could be the small change that makes a big difference.

https://amzn.to/4lObAvF

Why Microfiber Towels Are a Cleaning Game-Changer

Why Microfiber Towels Are a Cleaning Game-Changer

When it comes to cleaning smarter—not harder—microfiber towels… Whether you’re wiping down windows, drying your car, or dusting your shelves, these little cloths pack a big punch.

What Is Microfiber, Anyway?

Microfiber is made of super fine synthetic fibers—usually polyester and polyamide—that are smaller than a human hair. The tiny fibers are split during production, creating more surface area and allowing them to trap dirt, dust, and moisture far more effectively than regular cotton cloths.

Why Microfiber Towels Are a Must-Have

🧼 1. They Clean Without Chemicals
Thanks to their ultra-fine fibers, microfiber towels can grab grime and bacteria using just water. Great for eco-conscious or allergy-sensitive households.

🧽 2. Super Absorbent
Microfiber holds up to 7x its weight in water, making it perfect for spills, drying dishes, or even drying off the dog.

🌟 3. Streak-Free & Lint-Free Finish
Say goodbye to streaks on your windows, mirrors, and stainless steel. These towels leave surfaces shiny and clean without lint residue.

💪 4. Durable & Long-Lasting
With proper care, microfiber towels can last hundreds of washes, saving you money and reducing waste.

🌬️ 5. Fast Drying
They dry quickly, which makes them less likely to develop odors or harbor bacteria.

Best Uses for Microfiber Towels

  • Cleaning windows and mirrors
  • Dusting electronics and surfaces
  • Wiping down kitchen counters and appliances
  • Drying cars without scratching paint
  • Polishing furniture or chrome
  • Removing pet hair from fabric surfaces

How to Care for Microfiber Towels

To keep your microfiber towels working like new:

  • Wash separately (especially from cotton)
  • Use cold or warm water—not hot
  • Avoid fabric softener (it clogs the fibers)
  • Air dry or use low heat in the dryer

Microfiber towels may look simple, but don’t underestimate their power. They’re tough on messes, gentle on surfaces, and a smart swap for wasteful paper towels or ineffective rags.

So if you haven’t stocked up yet, now’s the time. Once you start using microfiber, you’ll wonder how you ever cleaned without it.

https://amzn.to/4lmel6R

5 Easy Tips for Cleaning Wooden Blinds Without Damaging Them

Wooden blinds bring warmth, texture, and timeless charm to any room. But when it comes to cleaning them? Let’s just say… it’s easy to put it off. Dust settles, grime builds, and suddenly those beautiful blinds are looking a little dull.

The good news? You don’t need fancy tools or harsh chemicals to bring them back to life. Just a little care—and the right technique.

Here are five easy, effective tips for cleaning wooden blinds while keeping them in great shape:

1. Dust Regularly With a Microfiber Cloth or Duster

Keeping up with dust prevents buildup and makes deep cleaning easier. Close the blinds and run a dry microfiber cloth or duster along each slat, then flip and repeat on the other side. A clean, dry sock over your hand works great too!

Work top to bottom to keep dust from falling on slats you’ve already cleaned.

2. Use a Vacuum With a Brush Attachment

If it’s been a while, a vacuum with a soft brush attachment can gently lift dust without spreading it around. Be gentle—wood can scratch easily!

Avoid using high suction or stiff bristles—these can damage the finish.

3. Damp Wipe for Stubborn Dirt

If dusting isn’t enough, lightly dampen a cloth with water and a tiny drop of mild dish soap. Wipe gently, then dry immediately with a soft towel.

Never soak wood blinds or let water sit—moisture can warp or stain the wood.

4. Tackle Sticky Spots With Care

Have spots near the kitchen? Grease and residue can collect over time. Use a damp cloth with vinegar diluted in water (50/50) for sticky areas—then dry right away.

Always test a small area first to ensure the solution doesn’t dull the finish.

5. Polish Occasionally for a Natural Shine

Want to keep your wooden blinds looking new? Use a wood-safe furniture polish or conditioner occasionally to restore shine and protect from drying out.

Avoid using polish every time you clean—once every few months is enough.

Consistency Matters

The best way to keep wooden blinds looking their best is regular care. A quick dust once a week keeps the grime away and saves you from bigger cleaning jobs later.

https://amzn.to/45x3ySW

Don’t Forget the Surge Protector

In many parts of the country, summer doesn’t just mean sunshine and barbecues—it also means thunderstorms. And with those storms often come power outages and electrical surges.

A friend recently experienced this firsthand. During a quick but intense storm, their power went out. When it came back on, their treadmill—a key part of their home workout routine—stopped working properly. It was a frustrating and costly reminder of something simple: the importance of using a surge protector.

Electronics, appliances, and even fitness equipment like treadmills and stationary bikes are vulnerable to power surges. Without a surge protector, one storm can do serious damage.

So here’s a quick reminder:
✔️ Use surge protectors for valuable or sensitive devices.
✔️ Unplug items during severe storms if you’re home and it’s safe.
✔️ Consider whole-house surge protection if outages are frequent in your area.

It’s a small investment that can save you big headaches—and expenses—later.

https://amzn.to/3SS1CwL
https://amzn.to/3HIG5Em

Maybe It’s Time to Switch to Glass Cutting Boards

We all have that one trusty cutting board—scratched, stained, slightly warped, and probably older than your dog. But what if it’s time for an upgrade? Specifically, what if it’s time to make the switch to glass cutting boards?

Yes, glass. Sleek, shiny, suspiciously clean-looking. Let’s cut into the pros, cons, and quirks of this unexpected kitchen upgrade.

🧼 The Hygiene Hero

Glass cutting boards are non-porous. Translation: They don’t soak up meat juices, onion smells, or the ghost of garlic past. A quick wash and they’re good as new—no stains, no lingering bacteria. For the cleanliness-obsessed, that’s a major win.

✨ Stylish and Modern

Let’s be honest—glass cutting boards just look cool. They’re like the kitchen equivalent of wearing sunglasses indoors. Available in all sorts of patterns and colors, they can actually match your kitchen décor… or your mood.

🔪 The Knife Controversy

Here’s the catch: glass is tough on knives. Like, really tough. If you’re the proud owner of an expensive chef’s knife, you might want to keep your old wooden board around for delicate slicing and dicing. Think of your glass board as the “backup dancer”—there when you need it, not always center stage.

☕ Multi-Purpose Marvel

Use it as a cheese board, a trivet for hot pans, or even a serving platter for snacks. Glass cutting boards moonlight as kitchen multitaskers. They’re the overachievers of the countertop world.

👂 Unexpected Bonus: ASMR Vibes?

The sound of chopping on glass is oddly satisfying to some and borderline annoying to others. You’ll either feel like you’re starring in your own cooking show… or like you’re rehearsing a tap dance with your knife.

Is switching to a glass cutting board right for everyone? Maybe not. But if you’re looking for easy cleaning, durability, and a touch of kitchen glam, it might just be time to retire that old plastic slab and give glass a try.

Just maybe don’t throw away your favorite knife sharpener while you’re at it

https://amzn.to/45WGj4D

What Is a GFCI Outlet?

GFCI stands for Ground Fault Circuit Interrupter. It’s a type of electrical outlet designed to protect you from getting shocked by detecting when electricity is flowing in an unsafe way—like through water, or even through you.

If it senses that current is escaping the normal electrical path, it shuts off the power in a fraction of a second.

Why Are GFCI Outlets Important?

Because water and electricity don’t mix. GFCI outlets are life-saving devices commonly installed in areas where moisture is present, such as:

  • Bathrooms
  • Kitchens
  • Laundry rooms
  • Garages
  • Outdoor outlets
  • Basements

These outlets reduce the risk of electric shock, electrical fires, and even fatal electrocution.

Do You Need GFCI Outlets?

Yes, and in many cases, it’s required by building code. If your home doesn’t have GFCI outlets in the right places—especially near water—it’s a smart upgrade. They’re not expensive, and any licensed electrician can install them quickly.

Even older homes can be updated with GFCI outlets to meet modern safety standards.

How to Know If Yours Are Working

Every GFCI outlet has a “test” and “reset” button. You should:

  1. Press the “test” button — the power should cut off.
  2. Press the “reset” button — the power should come back on.

If it doesn’t respond, it might be time to replace it.

GFCI outlets may not be the most exciting part of home maintenance, but they’re one of the most important when it comes to keeping your family safe. A small upgrade can prevent a major tragedy.

When it comes to electricity, a little prevention goes a long way.

GFCI Adapter Outlet

  • Features: Adds GFCI protection to standard outlets, easy installation.
  • Ideal For: Temporary setups or areas without built-in GFCI.
  • https://amzn.to/3ZkFvCK

The Best Way to Clean Really Dirty Hardwood Floors (Without Damaging Them)

Hardwood floors add warmth, beauty, and value to your home—but when they’re really dirty, cleaning them can feel intimidating. You want to get them clean, but not at the cost of damaging the wood. Whether it’s built-up grime, layers of dust, or sticky spills, here’s the best way to deep clean your hardwood floors and bring them back to life safely.

Step 1: Dry Dust or Vacuum First

Before anything else, remove loose dirt, pet hair, and debris. Use:

  • A microfiber dry dust mop
  • A vacuum with a floor-brush attachment (never a beater bar—it can scratch the wood)

This prevents grit from scratching your floors during the wet cleaning step.

Step 2: Mix a Gentle Cleaning Solution

Skip the harsh chemicals and create your own hardwood-safe solution:

  • ¼ cup white vinegar (natural degreaser and disinfectant)
  • 1 gallon of warm water

Or use a commercial hardwood floor cleaner labeled as safe for sealed wood.

Avoid steam mops, ammonia, bleach, and oil-based soaps—they can dull or damage the finish.

Step 3: Damp Mop (Not Wet!)

Dip a microfiber mop into the solution, then wring it out thoroughly. You want the mop damp—not dripping. Mop the floor section by section, rinsing and wringing the mop often.

Pro Tip: Always go with the grain of the wood.

Step 4: Tackle Stubborn Spots

For stuck-on grime or scuff marks, use a soft cloth dampened with the vinegar solution and gently rub the spot by hand. For sticky residues, a tiny drop of dish soap mixed into your vinegar solution can help break it down.

Step 5: Dry the Floor Immediately

Moisture is the enemy of hardwood. After mopping, use a dry towel or microfiber cloth to go over the floor and make sure no moisture is left behind.

Optional: Restore Shine

If your floors still look dull after cleaning, consider using a hardwood floor polish or restorer made for your type of finish (polyurethane, wax, etc.). Always test a small area first.

With the right tools and a gentle touch, you can bring even the dirtiest hardwood floors back to a beautiful, clean finish. The key is consistency—cleaning regularly prevents grime buildup and protects your floors long-term.