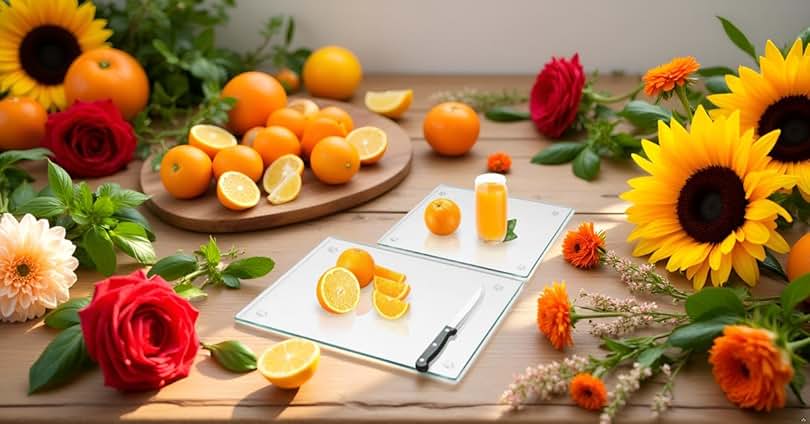
Clean Tools = Cleaner Results: Why Your Cleaning Supplies Matter

It’s easy to overlook, but the key to a truly clean home isn’t just how you clean—it’s what you clean with. If your tools are dirty, you’re not doing yourself any favors. In fact, you might be spreading grime around instead of picking it up.

A Dirty Mop Isn’t Helping

Mops that are soaked with old dirt and grime don’t absorb well. Instead of lifting dirt from your floors, they leave behind a streaky residue—and possibly even odor. Always rinse your mop thoroughly after each use, and let it dry completely to prevent mildew.

Your Vacuum Needs Some TLC Too

When your vacuum is full of dust or the filter is clogged, suction power drops significantly. That means dirt gets left behind—especially in carpets and tight corners. Empty the bin or bag regularly, and clean or replace filters as recommended by the manufacturer.

Dusters Shouldn’t Scratch

Dusters and microfiber cloths are great at trapping dust, but if they’re already loaded with debris, they can actually scratch surfaces—especially delicate ones like glass or wood. Wash them after use so they’re ready and safe for the next cleaning round.

Make It a Habit

The best way to make sure your tools stay in top shape? Clean them as soon as you finish using them. It only takes a few minutes and saves you time and frustration later.

Clean tools help you work smarter—not harder. So next time you grab your mop or vacuum, give it a quick check. A clean tool is a powerful one!

https://amzn.to/4lYlknY

When the Whole Family Pulls Together: Getting Projects Done (and Feeling Great About It)

There’s something special about everyone pitching in to tackle a project around the house. Whether it’s cleaning out the garage, sprucing up the yard, or giving a room a fresh coat of paint, when the whole family pulls together, amazing things happen—not just to the house, but to everyone’s spirit.

Why It’s So Great:

  • Teamwork builds pride. When everyone contributes, everyone feels proud of the results. It’s not just a cleaner house—it’s a family victory.
  • Life skills are learned. Kids (and sometimes even adults) learn how to paint, organize, garden, or fix things—skills that stay with them for life.
  • Memories are made. Projects often turn into moments of laughter, music blasting in the background, and maybe a few funny mishaps you’ll talk about for years.
  • It strengthens bonds. Working toward a common goal brings people closer. It’s about more than chores—it’s about teamwork and shared accomplishment.

How to Make It Fun:

  • Assign roles. Give everyone a job that matches their abilities or interests.
  • Make it a competition. Who can pull the most weeds or organize the most boxes?
  • Play music. A great playlist can turn work into a mini party.
  • Celebrate after. Pizza night, ice cream, or a family movie marathon is a perfect reward for a job well done.

When everyone chips in, the work gets done faster, and the feeling of accomplishment is even sweeter. Plus, it sends a powerful message: in this family, we show up for each other.

So the next time there’s a project looming, rally the crew. You’ll get a cleaner house—and an even stronger family.

7 Pro Tips for Shoveling Rock Without Breaking Your Back

Shoveling rock isn’t like moving soil or mulch—it’s heavier, tougher, and can quickly wear you out if you’re not prepared. Whether you’re spreading gravel for a path, filling a garden bed with river rock, or moving stones for a construction project, these tips will help you work smarter—not harder.

1. Choose the Right Shovel

Not all shovels are created equal. For rocks, go with a square-point shovel or a coal shovel. These have a flat edge, making it easier to scoop under the rocks and lift them efficiently. Avoid rounded shovels—they’re better suited for dirt.

2. Use a Wheelbarrow or Rock Sled

Don’t carry heavy loads any farther than you need to. Use a wheelbarrow to move rocks to their destination. For rough terrain or larger quantities, a plastic sled or heavy-duty tarp can help drag the load instead of lifting.

3. Wear the Right Gear

  • Gloves: Protect your hands from blisters and sharp edges.
  • Steel-toe boots: Keep your feet safe in case a rock falls.
  • Back support belt (optional): Helps prevent strain during repetitive lifting.

4. Loosen the Rock First

If the rocks are compacted or stuck together (especially if wet), use a rake or hoe to break them up before shoveling. This reduces strain and makes scooping easier.

5. Scoop Small Loads

It’s tempting to load up a huge shovel-full to get done faster—but resist the urge. Rocks are deceptively heavy, and you’ll tire quickly or risk injury. Small, manageable scoops are safer and more efficient over time.

6. Work in Short Bursts

Shoveling rock is physically demanding. Take breaks every 20–30 minutes, stay hydrated, and switch sides often to avoid muscle strain. Pace yourself—it’s a marathon, not a sprint.

7. Level and Rake as You Go

If you’re laying rock for landscaping, use a landscaping rake to spread it evenly as you dump. This prevents big piles and saves you from having to re-do areas later.

Rent Tools If Needed

For big jobs, consider renting a gravel scoop, mini skid steer, or rock-moving equipment from your local hardware or rental store. It can save hours of labor and a lot of wear on your body.

Shoveling rock doesn’t have to be back-breaking. With the right tools, technique, and mindset, it’s a manageable (and even satisfying) job that gets you one step closer to a beautiful or functional space.

https://amzn.to/4398quL

Jar Opener: A Simple Tool for Everyday Struggles

We’ve all been there—standing in the kitchen, ready to dive into that jar of pickles, salsa, or peanut butter. You twist, you turn, and you twist some more. You even try banging it on the counter, praying for some kind of miracle. But no, that stubborn jar refuses to budge. The frustration builds, and you wish you had someone around to help.

But wait—before you throw in the towel and admit defeat, there’s a simple solution that many overlook: a jar opener.

Why a Jar Opener is a Game Changer

It might sound simple, but a jar opener is one of those unsung kitchen heroes that can make life so much easier. It’s a tool that gets to the heart of the problem: grip and leverage. When you’re dealing with a tight, well-sealed jar, it’s not just about muscle—sometimes, it’s about having the right tool for the job.

The Benefits of Having a Jar Opener

  1. No More Struggling
    With a jar opener, there’s no need to bang the jar on the counter or try to use rubber bands or your sleeve for extra grip. These openers are designed to make twisting off tight lids effortless.
  2. Simple and Safe
    It’s an incredibly safe option—no need for excessive force, and definitely no need for risking injury by using knives, forks, or other makeshift methods to pry the lid open.
  3. Perfect for Anyone
    Whether you’re someone who loves to cook but has weaker hands, or you simply don’t want to deal with the hassle, a jar opener is a practical solution for all ages. It can be especially useful for seniors or anyone with arthritis or other hand mobility challenges.
  4. Compact and Affordable
    Jar openers are small, easy to store, and affordable. They’re an easy addition to your kitchen drawer, and they could be the difference between frustration and success when opening your favorite jar.

When You Need It Most

Imagine it’s late at night. You’re craving your favorite snack, but the jar refuses to open. No one’s home, and you’re about to give up. Then you remember: the jar opener sitting in your drawer, waiting to save the day.

Sometimes, we need help, even with the simplest things. A jar opener is one of those tools that just makes life easier. It’s small, efficient, and reliable—exactly what you need in your kitchen when that stubborn lid won’t budge.

The Takeaway

Next time you find yourself struggling with a jar and no one’s around to lend a hand, consider investing in a jar opener. It’s a simple, affordable addition to your kitchen that could save you time, energy, and plenty of frustration.

So, the next time you encounter a jar you can’t open, don’t worry—there’s a tool for that!

https://amzn.to/3YM3M4a

Elevating Your Space: Adding Texture and Design to Your Ceiling

When designing a room, we often focus on the walls, furniture, and flooring—leaving the ceiling as an afterthought. However, the ceiling is a blank canvas that offers a unique opportunity to elevate your space in a way that can transform an entire room. Adding texture and design to your ceiling can dramatically enhance the atmosphere, making it feel more inviting, luxurious, and thoughtfully designed.

1. Coffered Ceilings: A Classic Touch

A coffered ceiling is a timeless design element that adds depth and sophistication to any room. These ceilings consist of a series of recessed panels, which can be framed with wood, crown molding, or plaster. The depth created by the panels creates a sense of grandeur, and depending on the finish, coffered ceilings can complement both traditional and modern aesthetics. If you’re looking to add architectural interest, a coffered ceiling could be the perfect choice.

2. Textured Paint or Wallpaper

Textured paint can give your ceiling a unique look and feel. From subtle patterns to bold textures, the possibilities are endless. Adding a light stucco or sand texture can create depth, while a brushed pearl or metallic paint finish can add a touch of glamour. Alternatively, ceiling wallpaper with soft patterns, textures, or even bold designs can make a statement without being too overwhelming.

3. Wood Panels or Beams

Wood is a material that never goes out of style. Whether you opt for reclaimed wood panels, wood planks, or exposed beams, wood can create a cozy, rustic atmosphere. Installing beams across the ceiling can bring a natural, earthy feel to a room, and reclaimed wood adds character with its history. Alternatively, tongue-and-groove wood panels can offer a sleek, contemporary look, enhancing the sense of warmth and comfort.

4. Tray Ceilings: Subtle Yet Elegant

A tray ceiling features a raised central section that adds depth and elegance to a room. It’s a more subtle alternative to the coffered ceiling and is often complemented with crown molding or lighting. Tray ceilings are perfect for bedrooms, living rooms, or dining rooms, as they can make a space feel taller and airier. To further elevate the look, consider adding an accent color or subtle lighting along the edges.

5. Exposed Brick or Stone

For those who appreciate the industrial or rustic aesthetic, exposed brick or stone on the ceiling is a bold design move. This textured ceiling treatment adds instant character and creates a cozy, warm feeling that is ideal for urban lofts, kitchens, or even bedrooms. Exposed brick can also add charm and texture to a room while blending seamlessly with modern or vintage décor.

The ceiling is one of the most overlooked design elements in a room, but with the right textures and finishes, it can transform a space into something extraordinary.

Hearth or No Hearth: Making the Right Choice for Your Stone Fireplace

A stone fireplace is often seen as a centerpiece of the home, offering warmth, beauty, and a welcoming atmosphere. One of the most important design choices you will face when it comes to your fireplace is whether to add a hearth or not. While the hearth has been a traditional feature of fireplaces for centuries, there are pros and cons to consider before deciding if it’s the right choice for your stone fireplace.

What is a Hearth?

A hearth is the floor space directly in front of the fireplace, typically made of non-combustible materials such as stone, brick, or tile. Historically, it served as a safety feature, protecting the floor from sparks, ash, and heat. Over time, it has become a decorative element, as well as an extension of the fireplace’s design.

The Benefits of Adding a Hearth

  1. Aesthetic Appeal: A well-designed hearth can enhance the look of your stone fireplace and create a more traditional, cozy atmosphere. The hearth acts as a grounding focal point that can complement your décor.
  2. Safety: Especially for wood-burning fireplaces, a hearth helps prevent sparks or embers from damaging the flooring. This added layer of protection can give you peace of mind.
  3. Functionality: A hearth can provide additional space for placing firewood or decorative items like candles and plants. Some homeowners also use the hearth as a seating area, particularly with raised hearths.
  4. Increased Value: Adding a hearth can be an attractive feature for potential homebuyers. Many people associate a hearth with a more functional and aesthetically pleasing fireplace.

Why You Might Skip the Hearth

  1. Modern Style: If you’re looking for a sleek, minimalist look, forgoing a hearth might be a good decision. A hearth-free fireplace, particularly one made of natural stone, can create a clean, streamlined appearance.
  2. Space Considerations: In smaller spaces, a hearth can take up valuable floor space. If you’re looking to maximize your living area, skipping the hearth can help maintain a sense of openness.
  3. Maintenance: Without a hearth, you eliminate an area that collects ash, soot, and debris. For those who prefer a more low-maintenance space, this can be a practical reason to forgo the hearth altogether.
  4. Cost: Installing a hearth can add to the cost of the fireplace project. If you’re on a budget or prefer a more straightforward design, you might decide that the hearth is an unnecessary expense.

How to Decide

Ultimately, whether or not to include a hearth in your stone fireplace design depends on your personal preferences and how you plan to use the space. If you value the safety and functionality of a traditional hearth or want a more classic, warm look, adding one could be the right choice. However, if you lean toward a modern aesthetic or want to maximize your floor space, skipping the hearth could be the best option.

Your stone fireplace can be both beautiful and functional with or without a hearth. It’s all about your lifestyle, design goals, and what fits best within the room. Whether you add a hearth for warmth, safety, or style—or choose to keep things simple—you can be confident that your stone fireplace will continue to be a stunning focal point in your home.

Spring Cleaning Spotlight: Don’t Skip the Tile, Grout, and Windowsills

Spring is the perfect time to refresh your space and bring in the light—and while many of us remember to dust the shelves and swap out winter clothes, there are three often-overlooked areas that deserve some seasonal attention: tile, grout, and windowsills.

Tile: Shine It Up

Tile might look clean at a glance, but soap scum, water spots, and general buildup can dull its sparkle over time. Whether it’s in your kitchen backsplash or bathroom floor, give your tile a proper scrub this spring. A mix of warm water, dish soap, and a splash of vinegar can work wonders. For a deep clean, consider a tile-safe degreaser or steam cleaner.

Grout: Reclaim the White

Grout seems to attract everything you don’t want—mildew, stains, and grime. You don’t need harsh chemicals to bring it back to life. A paste of baking soda and water applied with an old toothbrush, followed by a light spray of vinegar, can lift years of buildup. Rinse and admire your handiwork!

Windowsills: Let the Sunshine In

Windowsills quietly collect dust, dead bugs, and sometimes even mold—especially in those corners where condensation lingers. Wipe them down with an all-purpose cleaner or a mix of vinegar and water. If you have wooden sills, follow up with a light polish or wood conditioner to protect the surface.

A Breath of Fresh Air

Spring cleaning isn’t just about tidying up—it’s about creating a home that feels renewed. Taking time to tackle these less-obvious areas can bring surprising satisfaction and a true sense of cleanliness.

So roll up your sleeves, open those windows, and let the fresh air (and light) flow freely again!

https://amzn.to/4j5E96B

🐾 Living with a Shedding Dog: A Lesson in Letting Go (and Vacuuming Often)

There’s dog hair on the couch. On your clothes. In your coffee mug. On the ceiling fan. How? You don’t know. But if you’ve got a dog that sheds, you know exactly what I’m talking about.

Trying to keep up with a shedding dog can feel like a full-time job. You sweep, you vacuum, you lint roll your entire outfit just to walk out the door… only to discover a rogue hair clinging to your lip halfway through a conversation.

It’s a Daily Battle—and a Lesson in Grace

At some point, you realize: you’ll never totally win the war against the fur. And strangely, that realization is freeing.

It becomes less about controlling every hair and more about managing your expectations, finding a rhythm, and letting go of the need for perfection.

Life Is Messy. So Is Love.

Dogs don’t worry about fur on the floor. They care about belly rubs, walks, and wagging their tails when you come home. The mess is a small price to pay for unconditional love, loyal companionship, and a face that lights up every time you say, “Wanna go for a ride?”

3 Quick Tips to Cope with the Fur Flood:

  1. Brush often – Daily brushing can dramatically reduce shedding (and doubles as quality time).
  2. Invest in a good vacuum – One that can handle fur like a champ. It’s worth it.
  3. Keep a lint roller in every room and car – You’ll thank yourself later.

Trying to keep up with a shedding dog is a little like life—it’s messy, a bit chaotic, and full of surprises. But when you embrace it instead of fight it, it becomes part of the joy.

And honestly? A little fur never hurt anybody. It just means you’re loved by a four-legged friend.


https://amzn.to/4lc4125
https://amzn.to/3YgOOD2
https://amzn.to/3R3a6A9

How to Stop Your Cups from Tasting and Smelling Like Soap After a Dishwasher Cycle

There’s nothing quite as off-putting as reaching for your favorite cup only to find it tastes or smells like soap, despite having just gone through the dishwasher. If you’ve noticed this problem with your dishes, you’re not alone! It’s a common issue, but the good news is that it’s usually fixable. Here are three simple steps to stop your cups from coming out of the dishwasher smelling and tasting like soap.

1. Check Your Dishwasher Detergent

The first thing to look at is the detergent you’re using. Too much detergent or a low-quality detergent can often leave residue on dishes, especially in the form of a soapy taste and smell. Here’s what to do:

  • Use the correct amount of detergent: Overusing detergent can lead to soap buildup, which ends up on your dishes. Check the detergent packaging for recommendations based on your water hardness.
  • Switch to a high-quality detergent: If you’re using a budget detergent, it might not rinse off as well, leaving residue behind. Consider switching to a high-quality brand or one that’s specially formulated for your dishwasher type.
  • Rinse aid: If your dishwasher doesn’t have a built-in rinse aid function, try using a rinse aid product. Rinse aid helps ensure that all detergent is washed away and leaves dishes sparkly clean without any soap residue.

2. Clean Your Dishwasher Regularly

Sometimes, the issue might not be with the detergent itself but with your dishwasher. If the machine is dirty or has soap buildup inside, it can transfer those smells and tastes onto your dishes. Here’s how to fix it:

  • Clean the dishwasher filter: Most dishwashers have a filter that can catch debris and food particles. Over time, this filter can get clogged and cause a buildup of grime. Remove and clean the filter regularly (about once a month) to keep things running smoothly.
  • Run a cleaning cycle: Many dishwashers have a dedicated cleaning cycle. Use this cycle with a dishwasher cleaner or white vinegar to remove mineral buildup, soap scum, and odors. Run the cycle with the dishwasher empty to give it a thorough cleanse.
  • Check for mold or mildew: If your dishwasher has a persistent odor, it might be caused by mold or mildew buildup, often found in hidden crevices. Wipe down the interior of the dishwasher with a vinegar solution or a specialized cleaner to eliminate any fungal growth.

3. Use the Right Dishwasher Setting

Not all dishwasher cycles are created equal. Sometimes, if you’re using a cycle that doesn’t get your dishes clean enough, detergent can be left behind, contributing to that soapy taste. Here’s what to do:

  • Choose a heavier cycle for tougher loads: If you’re washing cups that have stubborn residue, try using a more intensive cycle. It will give the detergent more time to break down food particles and soap, ensuring better rinse results.
  • Make sure the spray arms aren’t clogged: If the spray arms in your dishwasher aren’t rotating or spraying evenly, detergent can remain on your dishes. Regularly check that the spray arms are free from obstructions, such as food particles or mineral buildup.
  • Ensure proper water temperature: Hot water helps the detergent dissolve and rinse away properly. If your dishwasher isn’t heating the water to the correct temperature (usually between 120-150°F), it may not be rinsing thoroughly, leaving behind soap residue. If your dishwasher allows for temperature adjustment, make sure the setting is optimal.

Bonus Tip: Wash Cups Separately

If your cups are especially sensitive to soap residue, try washing them separately from dishes that are more likely to leave residue behind, like pans with grease. This will prevent soap buildup on the cups and keep them tasting and smelling fresh.

It’s frustrating when your cups come out of the dishwasher with a soapy taste, but by adjusting your detergent use, keeping your dishwasher clean, and using the right settings, you can say goodbye to that unpleasant smell and taste. These simple fixes will ensure your cups—and all your dishes—come out perfectly clean and ready to use.

Pro tip: If the problem persists after trying these steps, it could be worth checking your dishwasher’s performance or contacting a professional to ensure everything is functioning correctly.

How to Clean the Inside Glass of Your Washing Machine for a Sparkling Finish

A clean washing machine means cleaner clothes! Over time, detergent residue, hard water stains, and mold can build up on the inside glass of your washer, leaving it cloudy and less effective. Keeping the glass door clean not only improves your washer’s performance but also prevents unpleasant odors and bacteria buildup. Here’s a simple method to keep your washing machine’s glass crystal clear:

Step 1: Run a Hot Cycle with Vinegar or a Cleaner

Start by running an empty hot water cycle with either distilled white vinegar or a dedicated washing machine cleaner. Vinegar helps dissolve mineral buildup and kills mold, while commercial cleaners target grime and detergent residues.

  • Vinegar Method: Pour two cups of white vinegar directly into the detergent dispenser and run a hot cycle.
  • Washing Machine Cleaner: Follow the manufacturer’s instructions for the best results.

Step 2: Wipe Down the Glass Door

Once the cycle is complete, use a damp microfiber cloth or sponge to wipe down the glass door. Pay extra attention to any stubborn spots or streaks, using a bit of vinegar or mild dish soap if needed.

Step 3: Clean the Rubber Seal

The rubber seal around the door is notorious for trapping moisture, mold, and detergent buildup. Wipe it thoroughly with a cloth dampened in vinegar or an antibacterial cleaner. If there’s visible mold, scrub gently with an old toothbrush.

Step 4: Keep It Dry

After cleaning, leave the door slightly open to allow air circulation and prevent mold growth. Wiping the glass and rubber seal after each use also helps maintain cleanliness.

By following these simple steps regularly, you’ll keep your washing machine’s glass spotless and ensure your laundry stays fresh and clean!